Configuration Windows
The various configuration windows/dialogs are described in detail below. They are listed alphabetically.
Features
As with Configure Terrain (see below) this option first opens a dialog prompting you for which type of features you’d like to configure. Then a dialog similar to the Configure Terrain dialog above appears. The only notable difference it there isn’t a BG Color field because features don’t have background.
Grid
You can access this window via the View Option’s drawer Gear button next the the Show Grid checkbox.
Below you’ll find descriptions of each field:
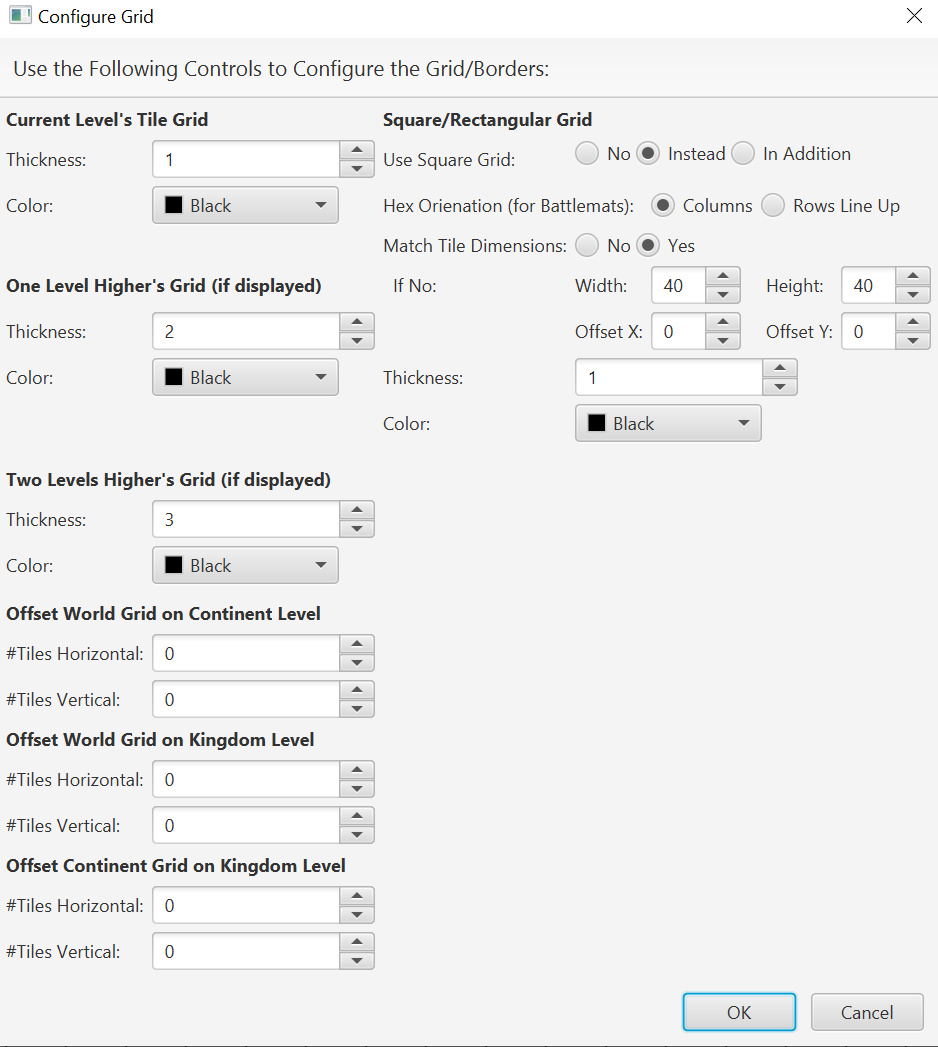
Current Level’s Tile Grid
The upper left area lets you configure the current view level’s grid.
Thickness: How thick should the grid line be, as a percentage of a tile’s size. This can be a decimal.
Color: Color of the grid using our standard color picker.
One Level Higher’s Grid (if displayed)
This section only applies for world/continent/kingdom maps when you are using multiple view levels. When viewing a level’s map, this controls how the grid for the level above is shown. For example, if looking at the continent level map, these settings control how the world map’s grid is shown. If looking at the kingdom level, these setting control the continent level’s grid. Like the section above, this just has Thickness and Color controls.
Two Levels Higher’s Grid (if displayed)
This section only applies for world/continent/kingdom maps when you are using multiple view levels. When viewing a level’s map, this controls how the grid for the level two levels above is shown. For example, if looking at the kingdom level map, these settings control how the world map’s grid is shown. Like the sections above, this just has Thickness and Color controls.
Offset ______ Grid on _______ Level
These fields allow you to shift how one upper level’s grid is shown when viewing another level in case you have a need to center them differently.
Square/Rectangular Grid
Use the upper right area to set the gird to be square (or not). This is followed by a few settings related to the chosen grid type.
Use Square Grid: You can choose “No” to have a hex grid, or “Instead” to use the square/rectangle grid or “In Addition” to see both grids at the same time.
Hex Orientation (for Battlemats): When using a hex grid on a battlemat, how should the hexes be oriented? So the columns line up, or the rows line up? Other map types are based on a hex grid, so the map’s hex orientation (chosen when created) is used.
Match Tile Dimensions: Should the grid match the current tile dimensions. (Set just under the mini-map.) Usually this is best set to yes, but in case you need to vary the grid, you can with the “If No:” settings. For these, the Width & Height allow you to set the grid’s width and height between grid lines. The Offset X & Offset Y are used if you don’t want the grid to start at “0,0”.
Thickness: How thick should the grid line be, as a percentage of a tile’s size. This can be a decimal.
Color: Color of the grid using our standard color picker.
Map Key
You reach this dialog via the Tools menu’s Configure Map Key option. It looks similar to the following:
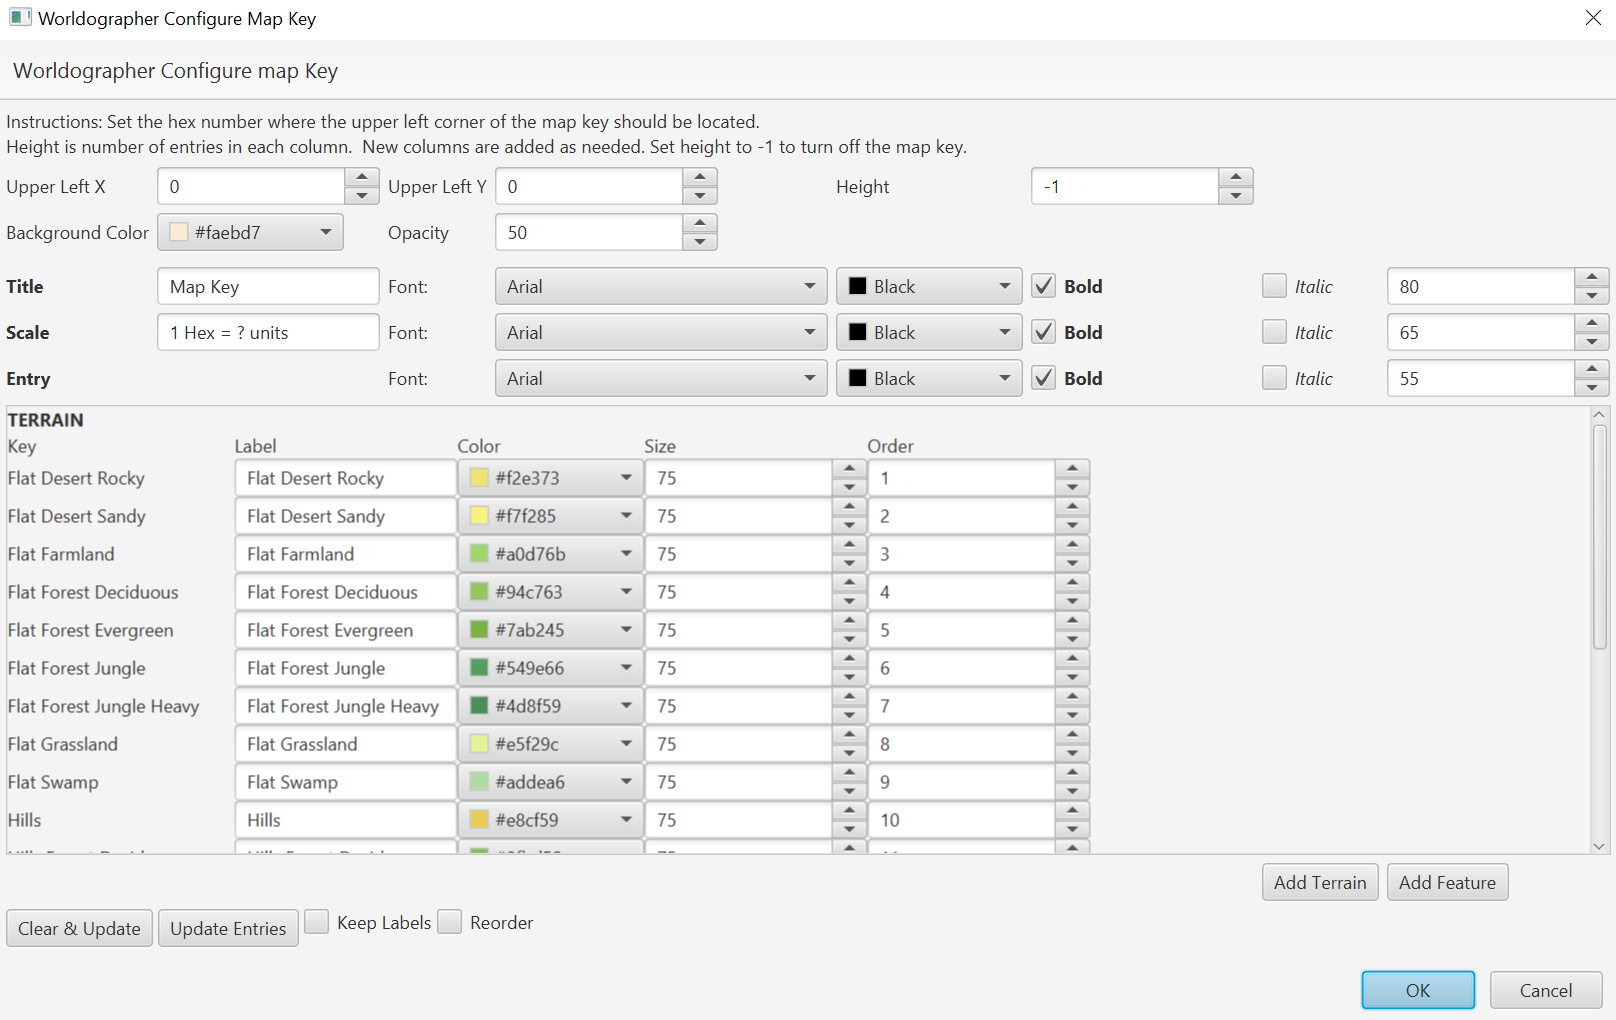
This dialog allows you to add a map key to the map. It is important the that height value in the upper right corner is greater than 0–otherwise the map key won’t appear. The system auto-populates the terrain and features section (the features section is not shown in the diagram, but below the terrain in that scroll area) with whatever terrain is currently on the map. You’re able to add more using the Add Terrain and Add Features buttons on the bottom right. Here are details for each field:
Upper Left X & Y & Height: The X&Y represents the tile coordinate for where the upper left corner of the map key should be placed. The height is how high the map key will be–if more room is needed, another column will be added to the key. If this is -1 or 0, no map key is added to the map.
Background Color & Opacity: The map key is displayed above a boxed area. This color & opacity is used for the boxed area.
Title & Font: The title of the map key and choosers for the font (face/name, color, bold/italic, the title’s height as a percentage of a hex/tile).
Scale & Font: Text for a note about the map’s scale and font selectors similar to the font settings for the title.
Entry Font: The font used for each entry in the map key, similar to the font settings for the title.
Terrain Fields (Key, Label, Color, Size, & Order): Each terrain used on the map appears here by default. You can use the Add Terrain and Add Feature buttons below to add more if you plan to use others or if you’ve added others to the map since creating the key. The Key is the name of the terrain type in the system, it can’t be changed. The Label is the text which will appear on the map key. Color is the background color used on the map key for this entry. By default it matches the terrain’s background color, but you can change this if needed (for just the key). Size represents the icon’s size as a percentage of a hex/tile. Finally Order is used to order the entries.
Feature Fields (Key, Label, Size, & Order): Similar to the Terrain Fields, except there is no background color. Also, note that the Order column is all one ordering for Terrain and Features.
Clear & Update: Clear the existing settings and recreate the Map key terrain & features settings based only on what is currently on the map.
Update Entries: Keep all the existing entries in the map key and add any terrain and features on the map but aren’t in the map key.
Keep Labels & Reorder: These two checkboxes are used for both the Clear & Update and Update Entries buttons. Keep Labels will ensure any labels that have been revised won’t change. Reorder allows the system to reorder all the terrain and features when the key is updated.
Add Terrain & Add Feature: These two buttons let you add more rows for additional Tterrain and features respectively.
Settlement Data
Settlement data is used primarily to populate settlements (cities, towns, and villages). This menu item opens a dialog to edit the data. See this video for more details. Below are descriptions of the fields on the window. The window is used primarily for setting up the data Worldographer uses to create settlement maps. It has multiple tabs.
Building Placement Tab
The first tab controls placement of buildings. Here is what it looks like:

Each control is described here. First the various columns of controls, then the buttons at the bottom.
Key Text Field
Worldographer’s settlement building placement algorithm will look for features loaded into the system with these key names and add them to the map based on the other field’s in each row. It does some text matching. So if the key is “Medieval Academy” then features named “Medieval Academy A” and “Medieval Academy B” If you rename the key to just “Academy” then a “Modern Academy A” or any feature with “Academy” in the name will match. When Worldographer’s Generate Buildings algorithm (when generating a new settlement via the File menu or generating/placing buildings via the Generate menu) it will look for all the buildings that have matching names and randomly pick one.
#/Population Number Field
This number field works as sort of the denominator when deciding how many buildings of this type to place in a settlement map. The chosen population when generating/placing the buildings (when generating a new settlement via the File menu or generating/placing buildings via the Generate menu) is the numerator. So in the case of a city of 5000 people, there would be 0 Academies based on the 15000 value in the graphic above (5000/15000=0). Remainders are discarded. But there would be one Armorer (5000/3000=1) and six Bakers (5000/800=6). These are semi-randomly placed on the map, but the other values in each row do have some control over placement.
On Road? Checkbox
If checked, the building is placed along a road.
Is Farm? Checkbox
This is a legacy setting which isn’t used. However, if the building is a farm or farm related, you should check it just in case some functionality along these lines is added.
Placement Drop-down List
You can force the place buildings algorithm to place a building “near” the city center, “away” from it, or “any” place on the map. The distance allowed for near or away is set by the Distance field described next.
Distance Number Field
Sets how many hexes away from the city center should be the cutoff for the Placement setting.
Dense
This field is not used any more. Instead, you can check a Dense box when you generate/place buildings which will make all the buildings near the city center more closely packed together.
Remove Checkbox
Check this box if you want this row of information to be removed when you next apply changes via the “Apply” button.
Add Row Button
If you have another building type you’d like to add to the Generate/Place Buildings algorithm, click this button and a new row is added to the main grid above. The system scrolls to the bottom of the grid for you when you use this button, but you may need to scroll a bit further down to see it.
Load Configuration Button
You can load a previously saved Settlement Configuration with this button which opens a standard file chooser.
Save Configuration Button
You can save the current Settlement Configuration with this button which opens a standard file chooser. Any changes you’ve made since you last applied any changes are applied when you save. (See the Apply Button section below as there is some data validation which could show a data entry error.)
Close Button
Closes the Settlement Configuration dialog without making any changes since you last clicked the “Apply” button.
Apply Button
This button saves the changes you’ve made to all of the tabs in the Settlement Configuration dialog. This doesn’t close the dialog however. Click the “Close” button to do so. The apply process does check to make sure your data is set up properly. For example, if the race percentages or language percentages (on the Races tab) don’t add up to 100, the settings save but you see a warning message. Expand the warning message (there is a button on the warning dialog to do so) to see which specific fields have data problems.
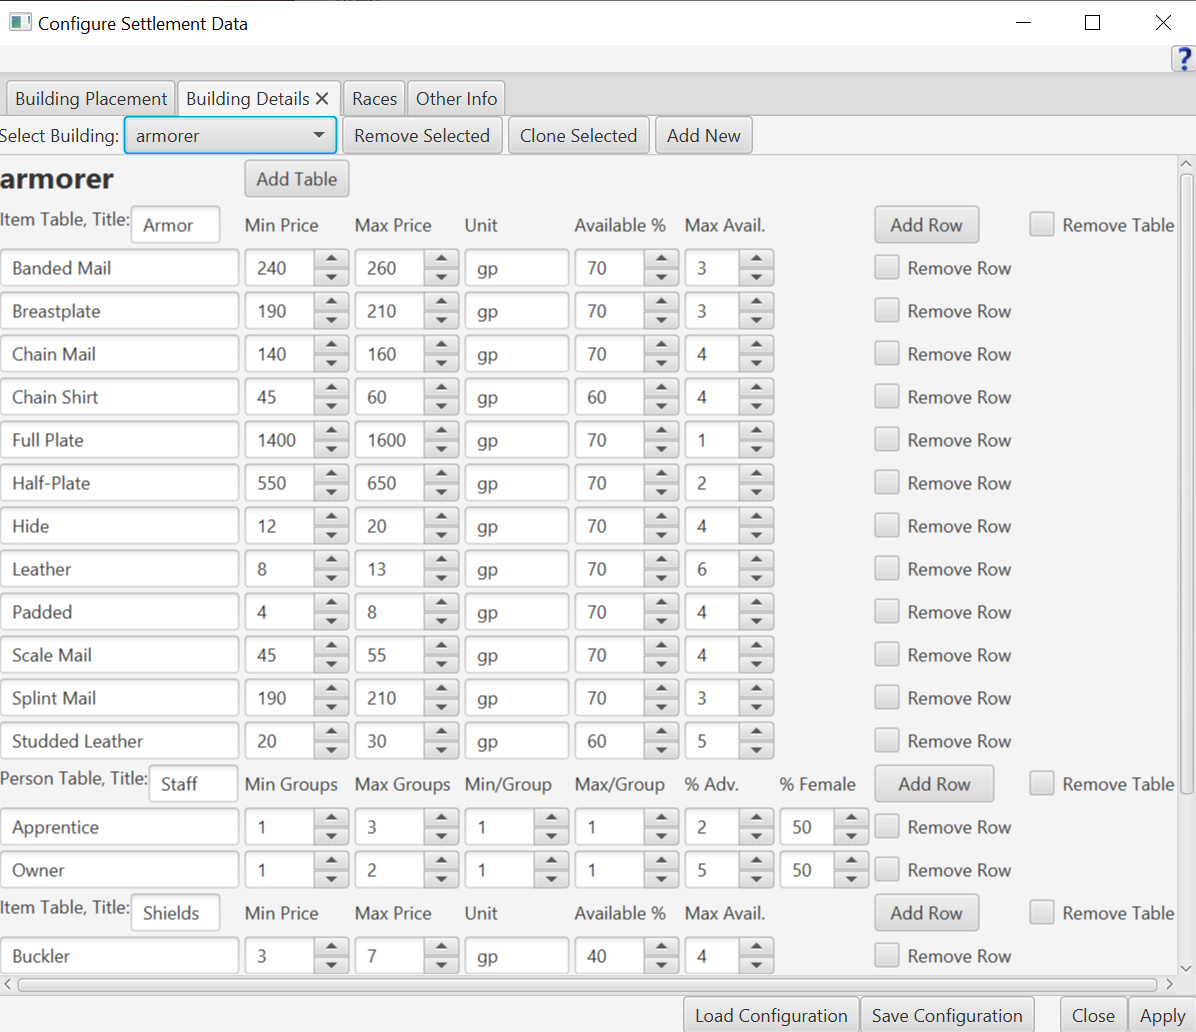
Building Details Tab
This tab lets you set up what information is generated for every building the Generate/Place Buildings algorithm adds to the map. The “Select Building” drop-down is the key to this tab because it determines what other information is displayed. Here is what the dialog looks like once a building type is selected in the Select Building drop-down:
Select Building Drop-down List
Remove Selected Button
Remove the selected building’s information from the generator. That building type can still be added to the map. (To stop that it must be removed from the Building Placement tab. But removing it here causes no data to be generated for that specific building type.
Clone Selected Button
Copies the selected Building type as a new building. A small dialog prompts you for the new building’s name, then the main area of the Configure Settlements dialog has the same setup information as the cloned building. You can customize it from that starting point.
Add New Button
Add data for a new building type by clicking this button. A dialog prompts you for a building name, then a tab similar to the above, but relatively empty except for the “Add Table” button appears.
Add Table Button
If you have a new set of data for something else in the store or about the building, add a new table. For example, put all a taverns drinks in one table, all of the entrees in another, desserts in a third, etc. Each table’s data will appear as a different tab in the Note dialog for the building.
Items Table Fields
Table Name Field: The name of this table to describe this group of people or items.
Add Row Button: If you want another item or person group for this table’s data, click this and one is added.
Remove Table Checkbox: Select this to remove the entire table from the building’s setup data, once you click the “Apply” button.
Item Table Fields
Type Field: What type of item is this row’s information specifying. Ex: Torches or Rope for a general store; Long Swords or Maces for an Armorer; various drinks for a Tavern, etc.
Min & Max Price Fields: The system will randomly pick a whole number between one of these two values. The minimum and maximum values are possible results.
Unit Field: Gold Pieces (gp), Silver, Copper, Dollars ($), Euros, Credits, Quatloos–whatever currency is appropriate for your campaign setting and the item type.
Available % Field: The percent chance that the store has any of these items in stock.
Max Avail. Field: The maximum number of these that will be in stock, if any are available. The system picks a number randomly between 1 and this number.
Remove Row Button: Removes this row of data from the building’s setup information.
Person Table Fields
Type Field: The type/role of this group of people. Perhaps they are just the Residents of a house, Cooks at a tavern, Wait Staff of a tavern, Maids of an inn, Owner of a store, etc. You can also be more general and just have a group called the Staff of a store.
Min Groups Field: The minimum number of groups of this person type for this building type. You may just have 1 group for a single family in a house, or you may want to make sure you have at least 2 or more families for a multi family house/apartment building. You can also use this for how many groups of customers are in an inn or tavern.
Max Groups Field: The maximum number of groups of this person type for this building type. Of course, this goes with the Min Groups Field immediately above.
Min/Group Field: This lets you specify the minimum number of people per group of this type added to the building.
Max/Group Field: Going with the Min/Group, this is the maximum number of people per group of this type.
% Adv Field: What chance is there that this group is made up of adventurers. Is it a tavern where a lot of adventurers hang out? Then make this a high value. Is this just a house, but you want there to be a very small chance one person is a retired adventurer? Then set it to 1 or 2%.
% Female Field: Some groups may be predominantly men or women. Use this field to specify what percentage of the group should be female.
Remove Row Button: Removes this row of data from the building’s setup information.
Load Configuration, Save Configuration, Close, & Apply Buttons
See the “Building Placement” tab above for details about these buttons.
Races Tab
This tab has all the information that drives which people are added to the settlement’s various buildings. It is also used when generating names for cities, nations/empires, cultures, religions, etc., which are created by the world/kingdom map generator and the Generate Nations/Empires option on the Generate window when you have a world/kingdom map open. The tab looks like this:
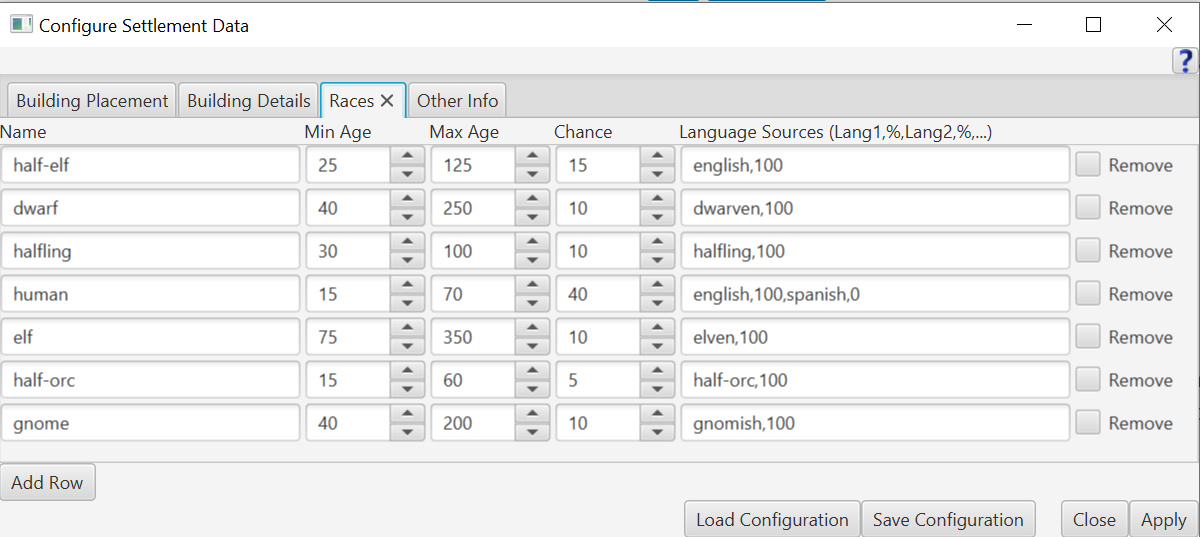
Name Field: The name of this row’s race.
Min & Max Age Fields: The minimum and maximum age of the people generated of this race. Each person’s age is a simple random number between these numbers, inclusive. We include the minimum because most people you’ll care about will be of some minimum age.
Chance Field: For each person generated, this number indicates the chance the person is this row’s race. These must add up to 100. If not, when you apply the changes, it will save but you will see a warning message.
Language Sources Field: This is a comma separated list of languages and percentages, with each percentage coming after that language. The percentages must add up to 100. If not, when you apply the changes, it will save but you will see a warning message.
Remove Checkbox: Removes this row of data from the race setup information.
Add Row Button: Adds another row to the main grid for an additional race’s info.
Load Configuration, Save Configuration, Close, & Apply Buttons
See the “Building Placement” tab above for details about these buttons.
Other Info Tab
This tab on the Configure Settlement Data dialog has fields for various other data used by the settlement generator. It is primarily made of a two column grid. The first section has some miscellaneous data fields. This is followed by several world list fields, and finally we have several Building Naming fields (not pictured below). Here is what it looks like:

Miscellaneous Fields
The first few rows of the grid are for several miscellaneous lists that the settlement generator picks from for properties about the people of the settlement. These are all comma separated lists. In order they are: Adv. Background (Adventurer Backgrounds), Occupations, and Quirks. One more miscellaneous list titled “Remaining Buildings” powers the settlement generator’s building placement. Any features that match or partially match (if an entry is Inn, then Medieval Inn A and Medieval Inn B will match as will Modern Inn A).
Next we have a series of Building Name Word Lists. These values work with the Building Naming fields, described immediately below. Each row’s left name identifier (such as “ITEM” or “NUMBER” in the picture above) is a keyword which will be replaced with one of the words in the list in that row’s text field.
The last part of the grid has a few building types on the left side of each row. If a building’s name matches (or partially matches as described earlier in this section), then the building will be given a name based on one of the values in the comma separated list for that row. So if the row is Inn, and the list of names has an option such as “The EMOTION ANIMAL” then the system will look at the word lists for any fully capitalized word and replace them with words from those lists. For example, “The EMOTION ANIMAL” may result in an inn called “The Laughing Orc” if Laughing and Orc are in those word lists.
Add Row
Clicking this button prompts the user to ask if they want to create a word list entry or building name entry (there is no need/purpose to add a miscellaneous row entry because the system wouldn’t use it for anything). The prompt also has a field for the word list or building type name. Then that row is added to the grid. Although the window tries to scroll to the new rows location, on some platforms you may have to scroll a bit further.
Load Configuration, Save Configuration, Close, & Apply Buttons
See the “Building Placement” tab above for details about these buttons.
Terrain
Because there are a lot of terrain icons built into Worldographer, this first opens a dialog prompting you for which type of icons you’d like to configure. Once you choose that, you’ll see a dialog like this one:
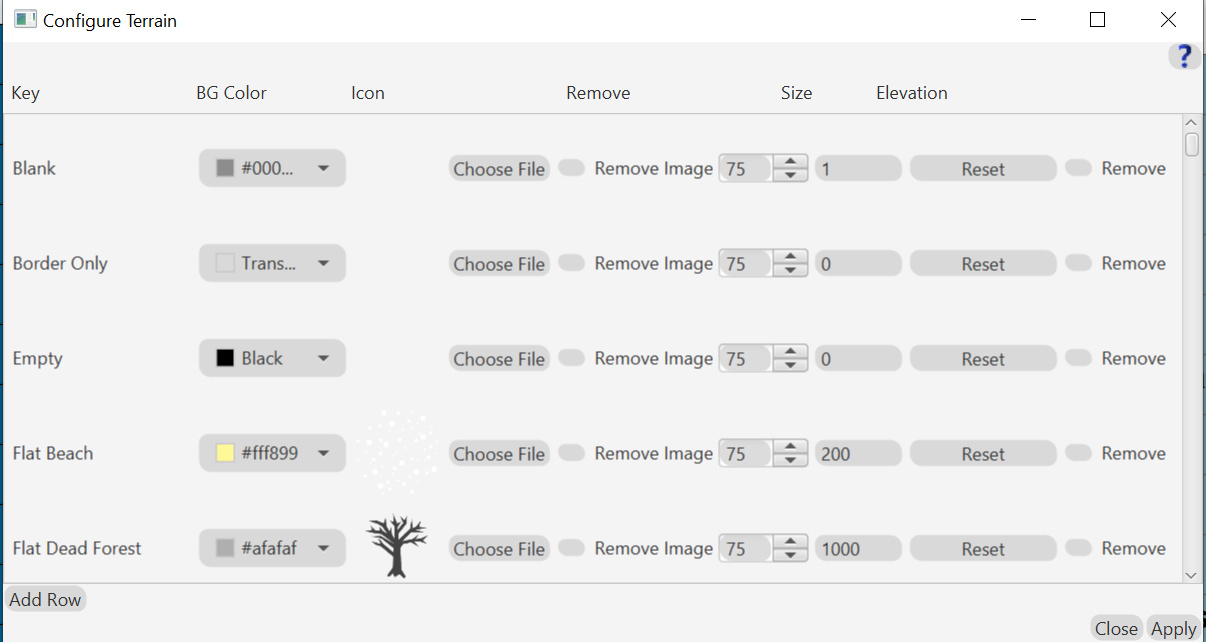
The list will likely be a long one. Here is a guide to each column in the chart and the buttons below:
Key: The name for this icon. (Can’t be changed.)
BG Color: A color picker for the background color of the terrain.
Icon: Shows the icon of the terrain. A “Choose File” button (which opens a file chooser) allows you to change it to something else.
Remove Image: Click this box and then the image will be removed when you next click “Apply” below.
Size: The icon’s size on the screen as a percentage of a hex or tile on screen.
Elevation: The default elevation of this terrain type, in feet. (Only used to ensure rivers usually go downhill. These elevation values are averages for the entire tile, so a river could go up to a slightly higher elevation–but it is a lower part of that other tile.)
Reset: This will reset the values of this row immediately. (You don’t have to click “Apply”.)
Remove: Removes this row when you next click “Apply”.
Add Row: Adds a row to the list at the bottom. The scroll bar does scroll to the new value at the bottom. Depending on your system, you may need to scroll a bit further.
Close: Closing the window without saving changes since you last clicked “Apply”.
Apply: Save any changes you’ve made.
Textures
Unlike Configure Terrain and Configure Features, this does not prompt you for a type to configure first. It simply opens a dialog much simpler than the Configure Terrain dialog above. It only has the following columns: Key, Icon, Reset, and Remove. It also has Add Row, Close, and Apply buttons.
Word & Name Data
The Configure Word & Name Data dialog allows you to control how names are generated for locations and people as well as bullet points of information for features, religions, and cultures.
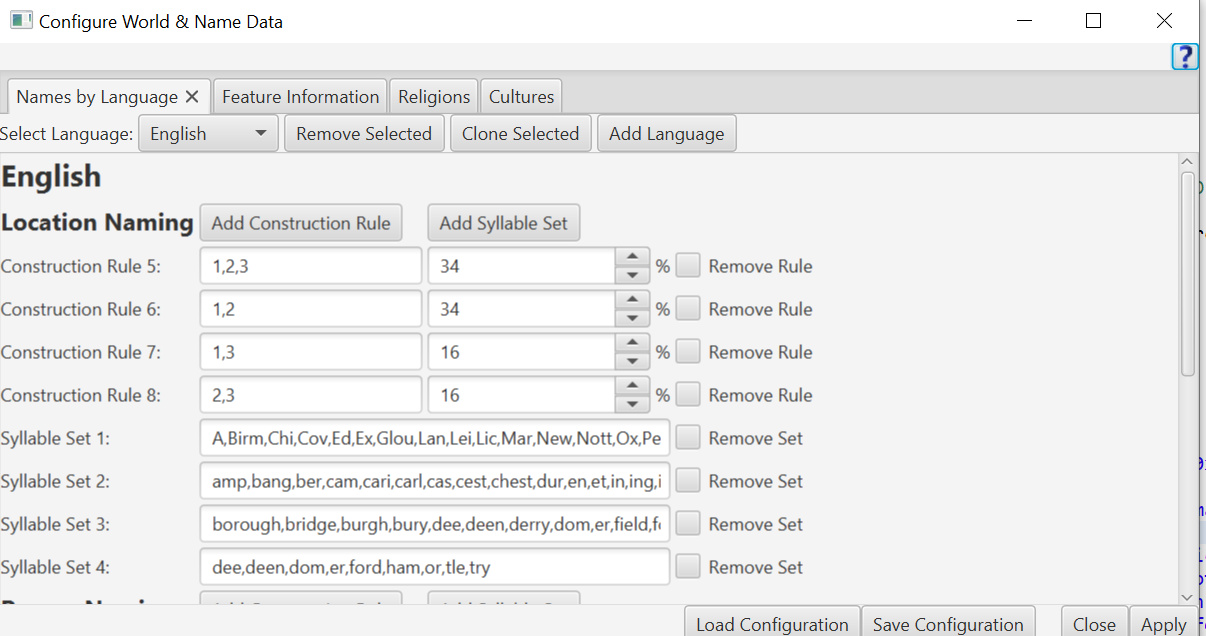
The initial tab that displays in the dialog is the “Names by Language” tab. Initially no language is selected, so the main area is blank. Once a language is selected, it looks like the following:
Note: Some things (such as adding new rows of info) will automatically apply changes made so far. But you must click “Apply” for any changes after to take effect otherwise.
“Save Configuration” also performs an apply before saving.
Names By Language Tab
The most complex tab of this configuration dialog, initially it is blank.
Select Language Drop-Down
One way to start is to select a language in the drop-down. Once a language is selected, the rest of the dialog is filled with information for the dialog.
Remove Selected Button
Removes the language currently chosen in the Select Language drop-down list from the system.
Clone Selected Button
Copies the language currently chosen in the Select Language drop-down list. A prompt appears asking you to name the new language. Then the main section of the Configure World & Name Dialog shows the new language’s information.
Add Language Button
Sets up a new language to be added to the system. A prompt appears asking you to name the new language. Then the main section of the Configure World & Name Dialog is set up for the new language. Once you click “Apply”, the new language will be added to the system.
Location & Person Naming Sections
The tab has two main sections: one for Location Naming and another for Person Naming. The two sections are very similar. However, note that the keys for person name syllable lists must start with ‘M’ and ‘F’ and each person name list must have at least one of each.
Add Construction Rule and Add Syllable Set Buttons: Each button adds a new row for the chosen purpose. This automatically applies your changes to data.
Construction Rule Text Fields: A construction rule simply lists the syllable keys to combine, separated by commas. For example, if the rule is ‘F1,F2’ the system will look at the F1 and F2 syllables lists, pick one of each and combine them. So if F1 has \”Ash\” in the list and F2 has \”wyn\” in the Ashwyn is one possible name.
Construction Rule Percentage Fields: The percentage represents the likelihood that rule is used. They must add up to 100%. You’ll want to make sure there is some chance of male and female person names because the person generator may randomly create men or women. Male syllable lists have keys that start with ‘M’ and female lists have keys starting with ‘F’.
Syllable Set Text Fields: These fields are simple lists of syllables (or full names with the construction rule set to just one “syllable” which is actually a full name) separated by commas.
Remove Rule and Remove Set Buttons: Will remove that line from the possibilities when changes are next applied.
Load Configuration Button
You can load a previously saved World & Name Data Configuration with this button which opens a standard file chooser.
Save Configuration Button
You can save the current World & Name Data Configuration with this button which opens a standard file chooser. Any changes you’ve made since you last applied any changes are applied when you save. (See the Apply Button section below as there is some data validation which could show a data entry error.)
Close Button
Closes the Configure World & Name Data dialog without making any changes since you last clicked the “Apply” button.
Apply Button
This button saves the changes you’ve made to all of the tabs in the Configure World & Name Data dialog. This doesn’t close the dialog however. Click the “Close” button to do so. The apply process does check to make sure your data is set up properly. For example, if the race percentages or language percentages (on the Races tab) don’t add up to 100, the settings save but you see a warning message. Expand the warning message (there is a button on the warning dialog to do so) to see which specific fields have data problems.
Feature Information Tab
Every feature added to the map can have details generated about it. (Place the feature on the map, then select the feature, then click the ‘Notes of Selected’ button the first time.) Thereafter, you can open the note the same way or by clicking on it on the map with the ‘Add/Edit/View Note’ button on the ‘View Options’ drawer.
The information generated is chosen based on the values here:
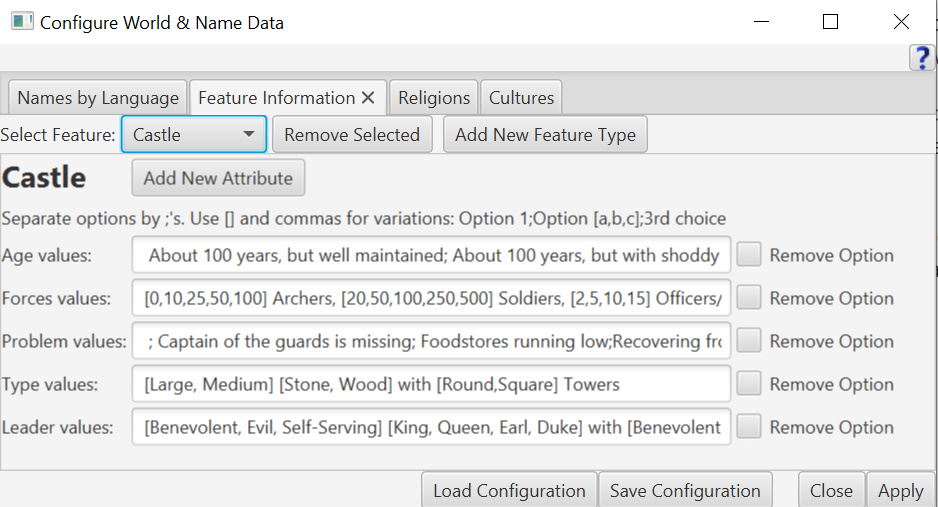
Select Feature Drop-Down: Changes the data displayed in the area below it to match the selected feature.
Remove Selected Button: Removed the selected Feature type’s data from the system (Not the Feature itself).
Add New Feature Type Button: Prompts the user for a name of the new feature then sets that Feature’s data as the data displayed in the area below. Initially this will be basically blank.
Add New Attribute Button: Clicking this button will add a new attribute to this Feature Type. This will apply changes made so far, after prompting you for the new attribute’s name. Then a new row will with that name and a blank text field. As in the text fields above, options should be separated by semicolons. Each option can contain some value to vary where the variations are separated by commas and surrounded by brackets. For example “In ruins covered in [vines,ivy,dust].”
Remove Option Checkbox: Removes that row of info when changes are next applied.
Load Configuration, Save Configuration, Close, Apply Buttons
See above.
Religions Tab
This tab allows you to add domains and options for the domains’ holy symbols. The religions and domains are generated when you create a world/kingdom map. Go to ‘Data’ in the menu bar and select ‘World Info’ to see it. You may also re-generate it. Here is what this World & Name Data tab looks like:
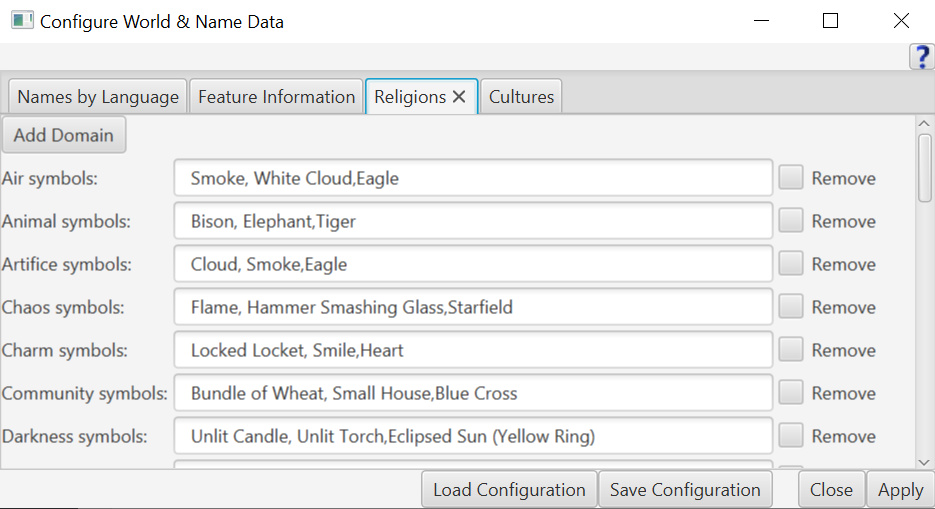
Add Domain Button
Clicking this will prompt you for a new domain name and will add a new row for it and its holy symbols.
Symbols Text Fields
Each domain has its own row with a text field for various holy symbol options separated by commas.
Remove Checkbox
Will remove that domain when changes are next applied.
Load Configuration, Save Configuration, Close, Apply Buttons
See above.
Cultures Tab
As with religion information, the cultures data is used to create World Information (see above). This tab allows you to list attributes for each culture, and one of the comma separated values is randomly chosen. Here is what it looks like:
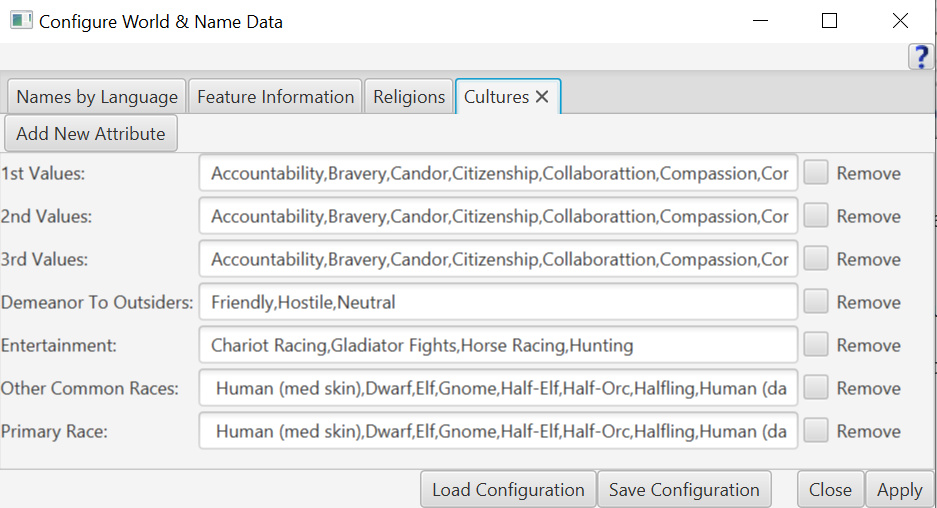
Add New Attribute Button
Creates a new row for a new culture attribute.
Attributes Text Fields
Each attribute has its own row with a text field for various options separated by commas.
Remove Checkbox
Will remove that attribute when changes are next applied.
Load Configuration, Save Configuration, Close, Apply Buttons
See above.