04. Creating World/Kingdom Maps
Worldographer World/Kingdom Setup Screen
Go to the File Menu and select New World/Kingdom map. You will see a dialog similar to the following:
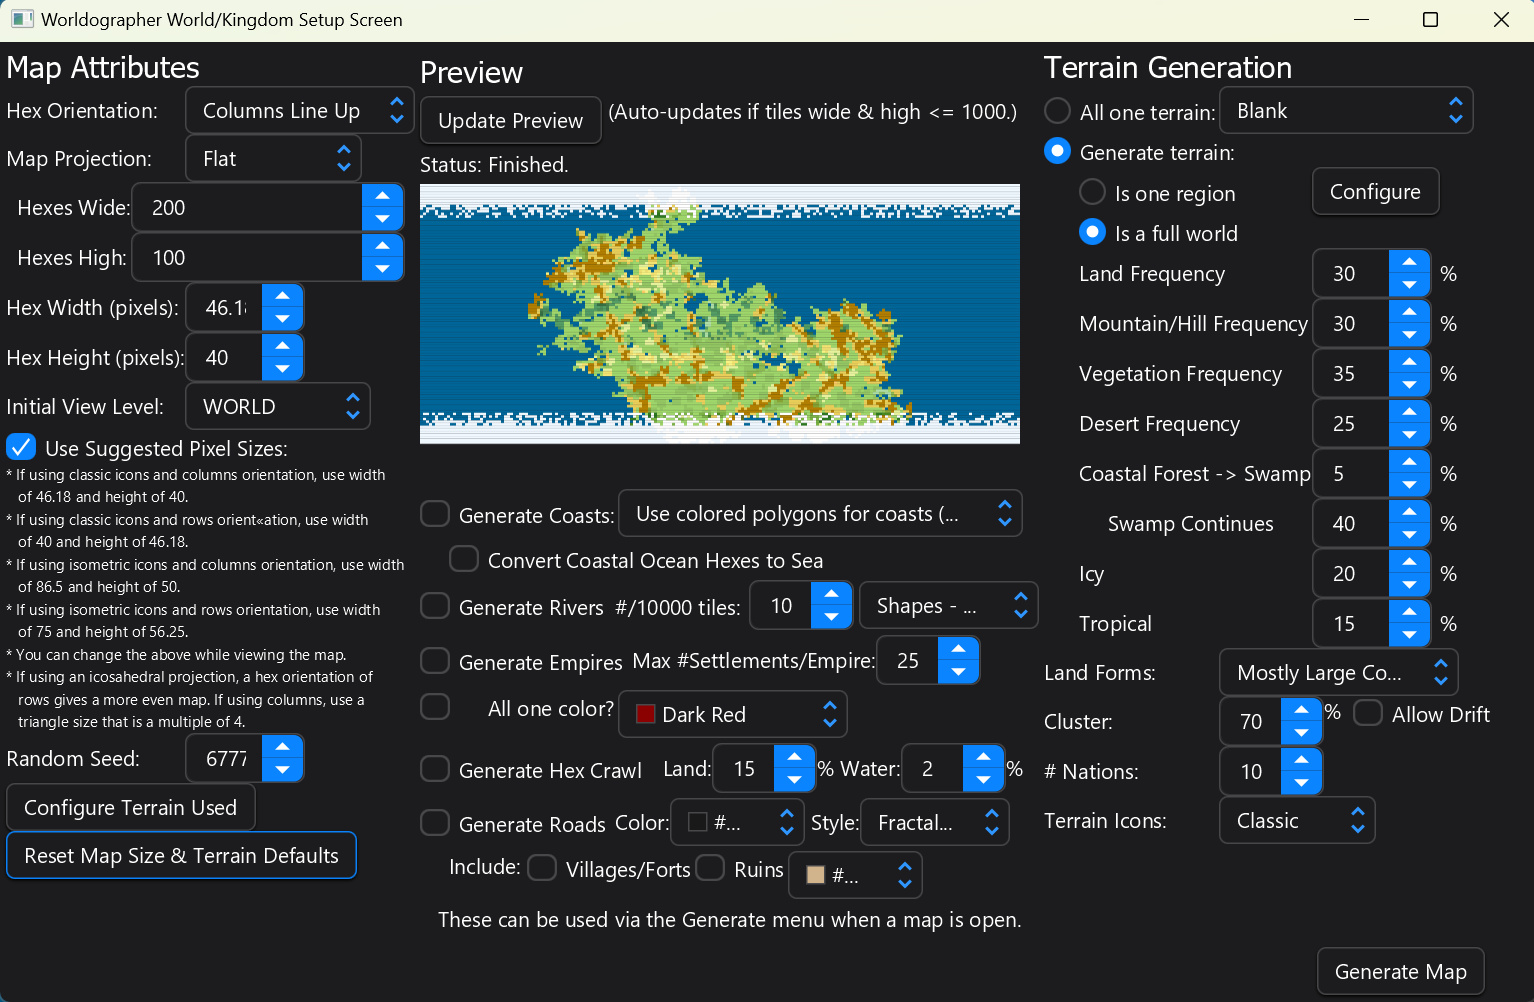
To generate a map, change the settings as desired (see below for a description of all options), and click the Generate Map button. In Worldographer 2025, the status and a Cancel button will be active in the menu bar. Pre-v2025, a dialog box showing the progress will appear showing the status of the map generation as parts of the map are created and a Cancel button to stop map creation.
Often, it is easiest to get the hang of new software by just using the default settings and giving it a try, then starting over with a few changes, and repeating a few more times. Worldographer makes this easy because generating a map is very quick. The live preview (center top) is very helpful as well. Below are more detailed instructions & explanations.
Left Section
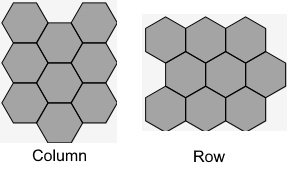
Hex Orientation
This option orients the maps so that either columns or rows line up, as shown here:
Worldographer’s grid can be turned off, or switched to squares. For World/Kingdom maps and Settlement maps, the terrain will still be hex based however even with a square grid on top. Battlemats use squares by default with floor tiles based on squares, but the grid can be switched to hex or turned off.
Note: When switching between the two formats on the World/Kingdom setup screen, the Hex Height and Hex Width will automatically swap, otherwise the map will appear distorted.
Map Projection
The two choices (Flat vs. Icosahedral) have a tremendous impact on the map layout. “Flat” is a typical flat map, where distances become very skewed as you approach the north and south pole. “Icosahedral” is a projection of a spherical map on a flat surface. Here is an example (this is set up to be very small as an example–typically you would not make a map this small):

Flat Map Projection
Flat map projection enables the author to set the Hexes Wide and Hexes High (as shown above) to set the size of the map.
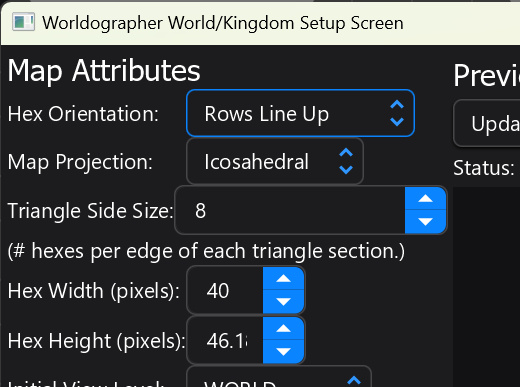
Icosahedral Map Projection
Worldographer supports a Flat Map projection and an Icosahedral projection (shown above) which was made popular in the Traveller game system as well as the Worldbuilder’s Guide Book among others. Visualize a d20 unrolled and flattened into 20 triangular sections.
When this option is chosen, Triangle Side Size replaces Hexes Wide and Hexes High (as shown below). This value changes the number of tiles that comprise each side of each triangular section. It represents how many hexes are on each side of of each triangle section of the icosahedral map. The map above has 8 hexes per side of each triangular section.
Hexes Wide & High
These fields are displayed when Map Projection: Flat is selected. See above for an example.
The size of the map is determined by the number of rows and columns specified.
Note: Worldographer does not enforce any particular scale. A hex can represent any number of miles (or other unit) desired. But we have an article regarding setting up an earth-sized world.
Triangle Size
This field is displayed when Map Projection: Icosahedral is selected.
This value determines how many tiles each triangle edge will have.
This feature may require experimentation on the map creator’s part. Create a map using the default value, then create additional maps with different values to get the size you’d like.
Icosahedral maps with row hex orientations work best with even numbered triangle sizes, but icosahedral maps with column hex orientations work best with triangle sizes that are multiples of 4.
Hex Width & Height (pixels)
These values indicate the size of each hex on screen and on paper (if printed).
These can be any values the author desires. There is no right or wrong. The suggestions at the bottom of the screen (see the first image above) provide guidance on sizing symmetrical hexagons, but if using isometric icons it may be desired to not use symmetrical polygons to force a perspective.
These values are not locked at creation time. At any time during map editing, the values may be changed in the Mini-Map area.
Note: The distance between the vertices of a hex will be larger than the distance between sides if the hex is symmetrical.
Initial View Level
One major feature in Worldographer Pro is the ability to have multiple map view levels in one map file. This enables the author to create a World map view with only major features, a Continent level map (which contains the entire world map, not just a continent, but on a smaller scale per hex and more features), and a Kingdom level map which can have every village and point of interest.
The map may be created using any of the view levels. See the Map Levels section below for instructions on creating the other view levels once a map has been created.
Use Suggested Pixel Sizes
This checkbox has a pretty full explanation below it. Keep it checked and if you make changes to the hex orientation or the Terrain Icons (below) it will update the hex width and height. Again, you’re always able to edit these later with the controls next to the mini-map when a map is open.
Random Seed
New in v2025. This number is the “seed” used for the random number generator to create the map. You can change this number and keep the other settings the same to generate a different map. If you like the map, jot down the number–it isn’t saved in the map file and is randomly set each time the World/Kingdom Setup Screen is opened. Also note that if the algorithm to create a world/kingdom changes in a future update, your seed likely won’t create a similar map to one this version of Worldographer created.
Configure Terrain Used
New in v2025. Clicking this button opens a new dialog window where you can change what terrain is used by Worldographer to generate a world (non-region) map:

If you’re using an alternate icon set and you’d like to replace the terrain placed by the generator for “Farmland”, select the desired terrain from the drop-down of that row. Note that these drop downs are also filters, so if you type “hills” in the drop down, then click the arrows on the side of the drop-down, you’ll only see terrain with “hills” in the name.
The “Save Settings” button near the bottom allows you to save these values after you have customized them. “Load Settings” allows you to reload those saved settings.
Note: You can also replace all the terrain on a given map by selecting the “Paint Bucket” (Flood Fill) icon on the Terrain toolbox, then picking a terrain type also on the same toolbox, and finally holding down the “alt” key and clicking the terrain you want to replace on the map.
Reset Map Size & Terrain Defaults
New in v2025. This button will restore all the other values on this screen to their defaults.
Middle Section
Update Preview
By default, the live preview area will update automatically as long as both the Hexes Wide and Hexes High values are 200 or less. In Worldographer v2025, the world generator algorithm is much faster, so the preview runs if those values are 1000 or less. If your map is larger, click this button when you’ve made some changes to the other values on this screen and want to see a new preview.
Preview Area
This is a very small version of the map that will be created if you were to click “Generate Map” with the current values.
All of the generate controls below are only available in Worldographer 2025. But note that they are also available from the “Generate” menu once a map is open. Most of these options do exist in pre-2025 Worldographer on the Generate menu, but without as many controls.
Also note while checking these boxes here allows you to create a full map in one step, leaving them un-checked and then using the Generate menu allows you to adjust terrain before adding coasts, then adjust the coasts before adding rivers, and so on.
Generate Coasts
Checking this box will automatically add coasts to your map based on what you select in the drop-down. You may pick “Feature” style icons in either our classic (flat color) style or our isometric (textured) style or “Shape” style coasts which are colored or textured polygons. For Shapes, the system will automatically use flat colors or textured depending on what terrain your map uses. If you have our “Ring Lord” icons installed, there will also be a flat color feature matching that style.
If you plan to use the world/continent/kingdom/province mapping functionality to drill down in the map, it may be better to use shapes instead of features for your coasts. When creating a new more detailed map level, Worldographer has no way to determine the exact bend of a given coastline feature, so it can’t add the correct extra features to match the shape of the coast on the other level. Shapes on the other hand are made via a series of points on the map so Worldographer can multiply each shape’s points when creating the new level. If you use features, you’ll have to manually pick and place new features for each map level.
– Convert Coastal Ocean Hexes to Sea
This control is related to the Generate Coasts checkbox above. Checking it will change the color of any terrain ocean hexes that are adjacent to land to a lighter sea color. This is true whether using the classic “flat” terrain or the more textured “isometric” style terrain.
Generate Rivers #/10000 tiles
Checking this box will add a number of rivers for every 10000 tiles (100×100, for example) equal to what you choose in the adjacent drop-down. So if the map is 200×100 tiles, and you pick 15 in the drop-down, it will try to place 30 rivers. It may not end up doing 30 rivers if it fails enough times. To get more rivers, you can always run this generator again on an open map via the Generate menu or hand place additional rivers.
The other adjacent drop-down lets you pick the type of rivers it will generate. If you pick either Shapes option, each river will be made up of several line shapes of increasing width as you get closer to the mouth of the river. Classic shapes have a flat blue color while Textured shapes have a blue texture which matches the Isometric tile set’s sea terrain. Both of these can be edited using the Shapes toolbox’s controls. If you pick Features the system will add more artistic looking Feature icons to make a river. These can be edited using the Features toolbox.
Note that as with Coasts, using features to make a river will make the world/continent/kingdom/province functionality a more manual process–you’ll have to hand place additional features on the other map levels.
Generate Empires
If checked, the generator will attempt to add a number of empires/nations equal to the number of nations selected in that other drop down (toward the bottom of the right column). The Max #Settlements/Empire drop down will give the generator a maximum number of cities, towns, villages, etc. that it will place in any one nation or empire.
– All One Color?
If this box is unchecked, each empire’s border will be a different color. If you wish for all the empires to have the same border color, check this box. Use the adjacent color picker to pick the specific color.
Generate Hex Crawl
Check this box to add random hex crawl locations throughout the map. These will generally be a feature such as “Ruins”, “Village”, “Shrine”, or “Shipwreck”. A note is also added to the map in that location with usually a few bullet points about that location. The “Land” drop-down is the frequency of hex crawl locations on land, and “Water” is the frequency in Ocean/Sea areas.
Generate Roads
If checked, the generator will automatically add roads between cities & towns & castles. Set the color of the roads with the adjacent color picker and pick the line style with the adjacent drop down. “Straight” will create straight lines between the locations. “Fractal-ish” will introduce several points along the path that vary slightly from a straight line to make the line look more natural. “Curve will create a cubic curve (anchor point, then two control points, then another anchor point) between each location.
The next line (“Include:”) lets you tell Worldographer to also connect villages & forts and/or ruins. You may use a different color such as tan for these roads to show they are more trail-like.
Right Section
All One Terrain
Select the All One Terrain radio button to produce a map where all tiles are filled with the terrain type indicated in the terrain drop-down list.
The All One Terrain and Generate Terrain radio buttons are a set – only one may be chosen at any time.
Generate Terrain
Alternately, the map can contain randomly generated terrain. The following options determine the parameters used to create the map.
Is One Region vs. Is A Full World
Selecting “Is a full world” will use Worldographer’s random world generation algorithm to create a world using the percentages set below this radio button (Land Frequency, Mountain Frequency, etc.).
Selecting “Is one region” will use the settings from the adjacent Configure button.
Configure button
Clicking this button opens the Region Settings dialog box:
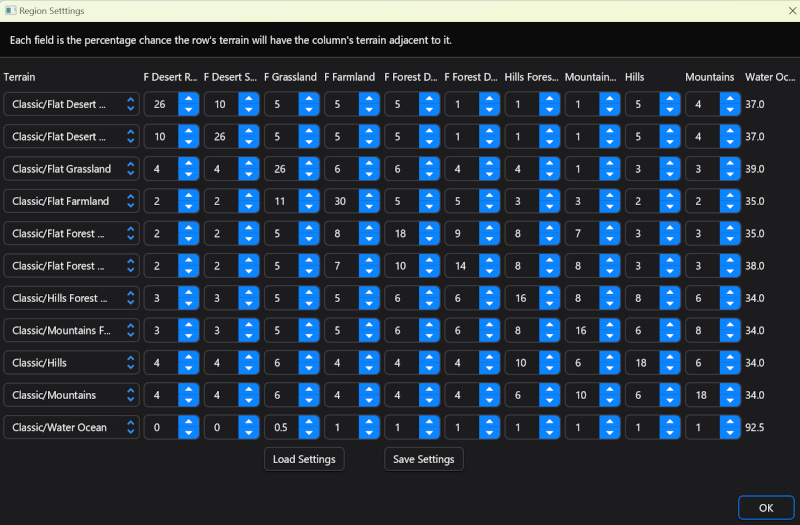
This dialog box enables the user to change the values used to generate region maps.
The list on the left contains 11 terrain types that are used to generate the map. When a new choice is made in one of the drop-down lists, the corresponding column heading is changed to match. This list is limited to 11 choices.
For each row, the number in each column is the percent chance that the terrain type of that column will be randomly chosen to populate a tile adjacent to the current tile. The values of each row must add up to 100 or less. The 11th column is automatically set so the row adds up to 100.
Note: If a value is set to zero (0), this indicates that terrain type will not be randomly selected when choosing a type.
How Region Map Generation Works
5% of the tiles are randomly set based on their total frequencies.
Then a tile is randomly selected, and an adjacent populated tile is used to determine the type of a selected tile, e.g., if a tile is Flat Desert Rocky, there is a 26% chance an adjacent tile will also be Flat Desert Rocky, 10% Flat Desert sandy, 4% Flat Grassland, etc.
This repeats until all tiles are populated.
Land Frequency
For Full World map generation, this value is the percentage of tiles which will contain some form of land terrain; the remainder will contain water terrain.
Mountain Frequency
For Full World map generation, this is the percentage of land which will contain mountain terrain. The remainder will contain non-mountain terrain.
Vegetation Frequency
The percentage of land which will contain forest terrain when doing Full World map generation. The remainder will contain non-forest terrain.
Desert Frequency
How much of the land should be turned into desert.
Coastal Forest -> Swamp
This is the likelihood that a forest on the coast will become swamp. The field under it (“Swamp Continues”) is the likelihood that any adjacent hexes will turn into swamp and so on.
Icy
When doing Full World map generation, this value changes how wide the “arctic” area will be near the north and south “poles” (top and bottom of the map).
Tropical
For Full World map generation, this value changes how wide a “tropical” area is in the middle of the map, between the two poles.
Land Forms
These options let you choose the size of the land masses on the world.
Cluster
How much to cluster the landmasses.
An Aside: How World Generation Works
A number of land masses are placed on the map until the desired land frequency is roughly met. Where these overlap, hills appear. If there are multiple overlaps, mountains will appear. Additional clusters of hills & mountains are added in lines until the mountain frequency is met. Clusters of vegetation are added to meet the vegetation frequency. Deserts are added usually at 1/3 and 2/3 of the way down the map (at about 30-degrees north and south of the equator). Then terrain near the poles are made “icy” based on the icy setting and forests are made evergreen. (A setting of 100 would create an ice world.) Finally, areas near the equator are made tropical (forests are shifted to tropical from deciduous) based on that setting.
#Nations
This pre-populates the number of nations to be generated in the “World Info” dialog (accessed from the Data menu). When you create a new world map, Worldographer automatically generates a number of Nations, Cultures, and Religions which you can fully edit. (Or ignore if only using the program as a map editor.) #Nations is also used when using the Generate Nations/Empires function in the Generate menu.
Note: This value can be changed at the time nations are generated. See Generate Nations/Empires for more details.
Terrain Icons
Worldographer makes it easy to make maps in three styles: Classic (flat icon graphics like those in many 1980s RPG products), Isometric (more detailed graphics like those in strategy computer games), and 1st Edition/World graphics. Select Classic to use the 1st Edition/World graphics and see our Creating 1st Edition/World Style Maps video.
Map Levels
Worldographer supports 4 levels of World/Kingdom maps which are versions of the same map that differ in scale and details.
Let’s start with a World map. (See above for instructions on how to create one.)
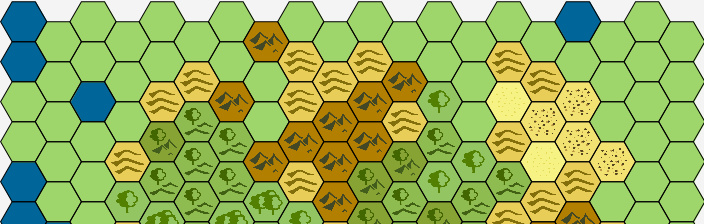
This map represents an entire world and is normally high level. Each tile may encompass hundreds of miles on the ground:
In the Mini-Map area (see Section 6 Mini Map for details) a different level may be selected. (Note: this is a Pro version feature.) If we choose Continent, Worldographer automatically makes a copy of the World map and expands it. For instance, if the expansion is 3 tiles (you can pick any number up to 30), each tile on the World map is replaced with 3 tiles across (for a total of 9) on the Continent map. This may resemble something like this:
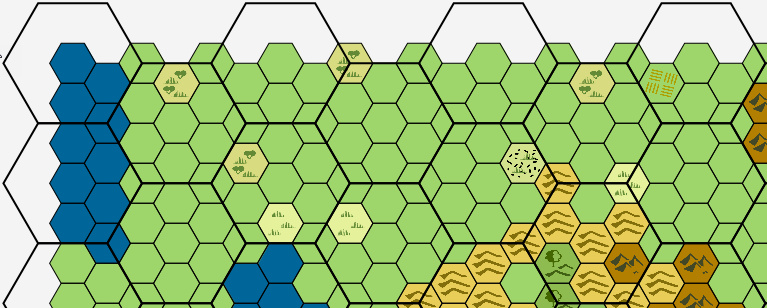
Note that Worldographer displays the tile borders of the World map with the expanded tiles inside each. Configure this using the configure grid button at the bottom of the Worldographer window.
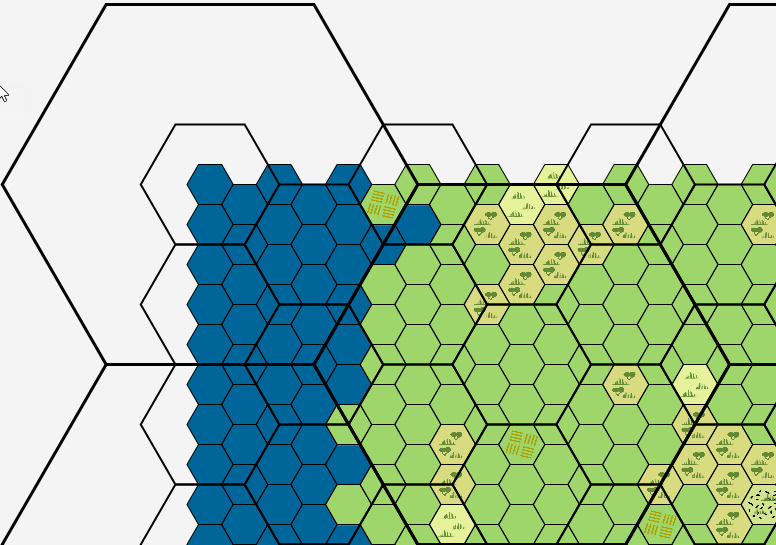
Now select Kingdom in the Mini Map area’s View Level drop down. After prompting you again for a number of hexes per parent level hex, it produces a third map. This one has tile borders for the both the World and Continent maps displayed. This will resemble the following:
And this may be done a 4th time for a province level map.
Why is this useful?
This feature allows the user to design a world at a very high level and not worry yet about the details.
Then the user can drill down to the Continent level, which shows more detail and the Kingdom level for more. Finally, the Province level provides the most detail. Using the Mini Map area’s View Level drop-down, the user can switch between the levels as desired.
Note: This example started with the World and expanded it. The map can be started at the Continent or Kingdom level. If starting at the Kingdom level, switching to Continent produces a map where the features of the Kingdom map are compacted. Smaller features may be set to not appear in the Continent map. (See the Features drawer’s World, Continent, Kingdom, and Province checkboxes for details to set Features to not appear on some view levels. The same can be done with Labels and Shapes via similar checkboxes on those drawers. Switching to World view compacts the map even more.
Important Note: All four map levels are stored inside the same file, which eliminates needing to keep track of a different file for each level.
Note/Information
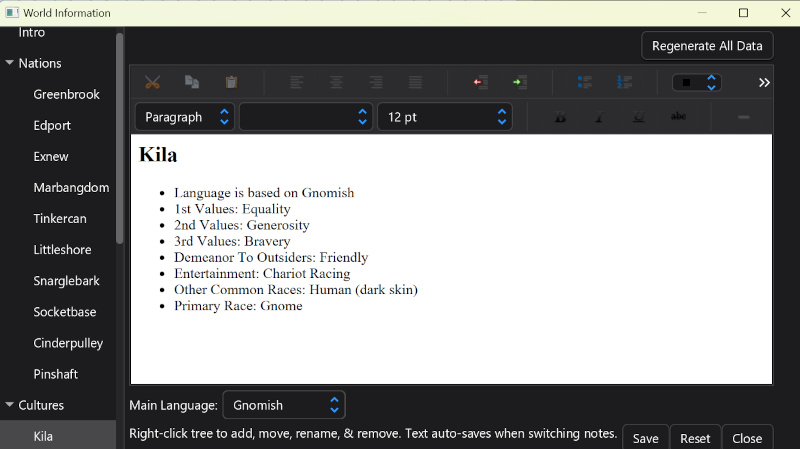
The menu bar has a Data menu with a World Info item. Choosing that with a world map open shows a list of Cultures, Nations, and Religions plus an Intro area & Timelines area. Expand the Cultures, Nations, and Religions sections to see details of each one generated by the software. Customize the results to your preference or erase them completely and fill in exactly what you had in mind. Or ignore this feature and use Worldographer only as a map maker.
Worldographer will export this data via the File menu’s Export Notes/Information To HTML option. See the menu options explained page for information regarding exporting this feature.