07b. Menu Options Explained
Below are explanations on how to use each menu option in Worldographer, starting with the File Menu:
File Menu
New World/Kingdom Map
See the detailed instructions for this feature.
New City/Town/Village Map
See the detailed instructions for this feature.
New Battlemat/Dungeon Map
See the detailed instructions for this feature.
New Sub/Sector Cosmic Map
Detailed instructions coming soon.
Open
Allows you to pick a Worldographer map file to open in Worldographer via a file chooser. Hexographer files can be opened via the Import Hexographer 1 Map options below. Images such as .pngs, .jpgs, etc., can only be traced over via the “Trace Underlay” drawer detailed below.
Open Recent
This option shows a sub-menu of the most recently opened 10 map (.wxx) files so you can easily reopen them.
Open Into This Map…
This option allows the author to insert a map into the currently open map. This option has caveats:
Save the current map before choosing this option! If the result of an “open into” action does not produce a desired result, close the map without saving, then open it again to start over. Once a map is saved, there is no reversing an undesired action.
- The author must select the tile which will be where the upper left tile of the inserted map will be placed. Important: Worldographer numbers the tiles from zero (0) The tile in the upper left corner has Column/X=0, Row/Y=0.
- The inserted map will overwrite any part of the current map that is within the area selected for the inserted map to be placed.
- The current map must be large enough to accommodate the inserted map. Any part of the inserted map that does not fit in the current map will not be copied.
- The author should know the size of the current map, e.g., how many tiles high and wide. The author needs to know the size of the inserted map, and where it will be placed.
If the current map is not large enough to contain the inserted map, stop! Select Tools | Expand/Shrink Columns/Rows to resize the map. Once that is completed, resume here.
When the option is selected, the Open Into Map dialog box will appear, resembling this:
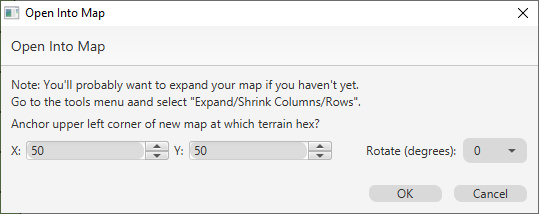
If your current map is 20 tiles wide and 30 tiles high, and you want a same-size map inserted to the right of the current map, do the following:
- Resize the map to add 20 tiles on the right side of the map (Tools | Expand/Shrink Columns/Rows).
- In the Open Into Map dialog box, set X: to 20 and Y: to 0.
This will insert a map to the right of the current map.
If Y: is set to 30 and X: is set to 0, the inserted map will be placed below the current map.
If Y: is set to 10 and X: is set to 10, all tiles starting with tile X:10 and Y:10 and extending down and to the right will be replaced with the inserted map.
Suggestion: Generate several maps and experiment with this feature before using it.
Make Dungeon Geomorph Map…
This feature enables the author to produce a map using smaller maps as parts, randomly arranging the smaller maps. Note: Random dungeons are better created using Generate Dungeon options on the Battlemat Setup Screen.
Before selecting this option, create several Battlemat/Dungeon maps. This works best if the maps are square (same number of tiles high and wide) and all are the same size. Place all maps in the same folder for easier use.
Select File | Make Dungeon Geomorph Map, and a dialog box resembling the following appears:
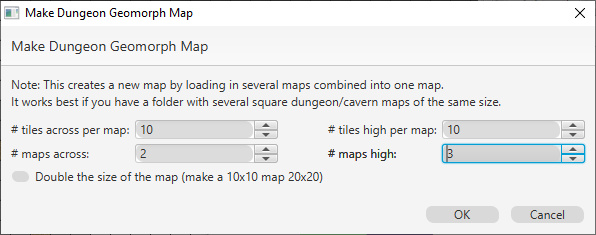
Enter the width of the individual maps in # Tiles Across Per Map and the height of the individual maps in # Tiles High Per Map.
Note: If the width is smaller than that of any individual map, the tiles on the right will be truncated. If the height is smaller than that of any individual map, the tiles on the bottom will be truncated. Similarly, if the width and/or height is larger than an individual map, blank tiles will be added on the right and/or bottom.
The # Maps Across and # Maps High indicate how many maps will be tiled across and up/down. For example, when the values are these:
- # Tiles Across Per Map = 10
- # Tiles High Per Map = 10
- # Maps Across = 3
- # Maps High = 3
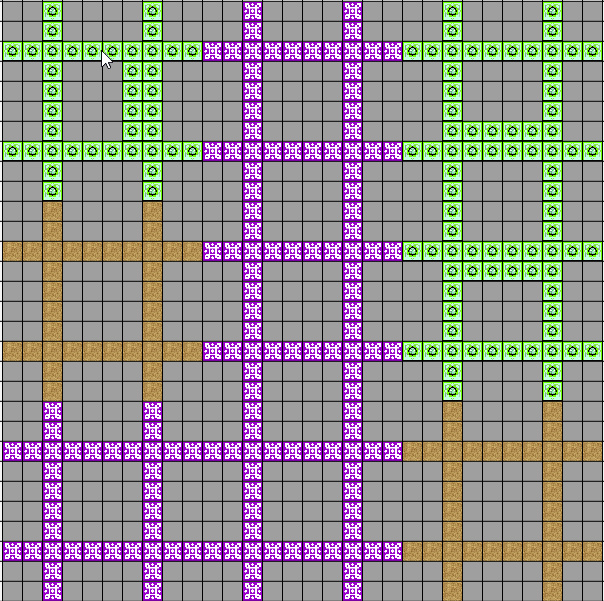
The resulting map will be 100 tiles high and 80 tiles wide. For example, if three maps resembling these extremely simple examples are used:
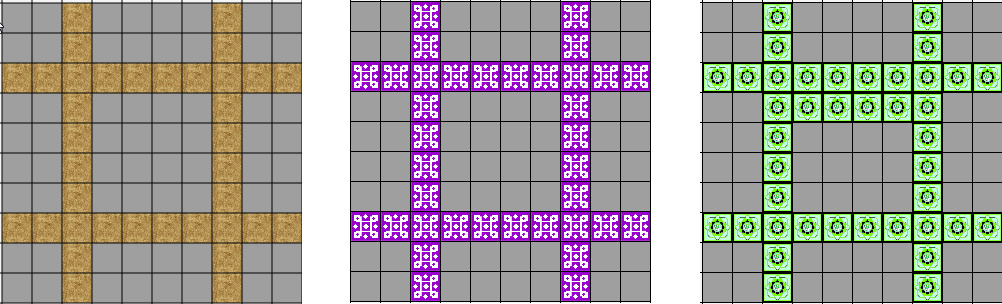
The resulting map would be something like this:
Save (Ctrl+Shift+S)
If the map has previously been saved, selecting this option will save the current state of the map to the same location, replacing the previous version.
If the map has NOT been previously saved, a Save As dialog box will appear. See below.
Save As
Select this option to save the current map with a different name and/or location. A standard file chooser will appear. Navigate to the desired location and enter the desired name, then click Save.
Import Hexographer 1 Map
This option enables the author to convert a Hexographer map (our original world/kingdom hex mapping program), converting the original file format into Worldographer format.
This produces a new map that is a copy of the original. When the new map is saved, it has the Worldographer file extension (wxx) instead of the Hexographer file extension (hxm). The original map is unchanged.
Note: Worldographer can read Hexographer maps but cannot create them. All saved maps will be in Worldographer format, and the new map cannot be opened in Hexographer.
When this option is selected, a dialog box resembling the following will appear.
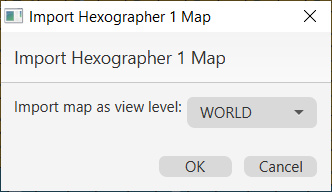
The map may be imported as World, Continent, or Kingdom. See the Map Levels section of the Creating World/Kingdom maps page for more details on map levels. Select the desired level and click OK. A standard file chooser will appear. Navigate to the desired map, selected it, and click Open. The map will be imported as a new Worldographer map.
Import Hexographer 1 Map Into Current Map
This option enables the author to import a Hexographer map into an existing Worldographer map. This functions exactly like the Open Into This Map, with the exception that a Hexographer map is being imported, not a Worldographer map. See Open Into this Map above for instructions.
Import Dungeonographer 1 Map
This option enables the author to open a Dungeonographer map (the original dungeon mapping program), converting the original file format into Worldographer format.
This produces a new map that is a copy of the original. When the new map is saved, it has the Worldographer file extension (wxx) instead of the Dungeonographer file extension (dgo). The original map is unchanged.
Note: Worldographer can read Dungeonographer maps but cannot create them. All saved maps will be in Worldographer format, and the new map cannot be opened in Dungeonographer.
When this option is selected, a standard file chooser will appear.
Navigate to the desired map, selected it, and click Open. The map will be imported as a new Worldographer map.
Import Cityographer 1 Map
This option enables the author to open a Cityographer map (the original city/town mapping program), converting the original file format into Worldographer format.
This produces a new map that is a copy of the original. When the new map is saved, it has the Worldographer file extension (wxx) instead of the Dungeonographer file extension (cgx). The original map is unchanged.
Note: Worldographer can read Cityographer maps but cannot create them. All saved maps will be in Worldographer format, and the new map cannot be opened in Cityographer
When this option is selected, a standard file chooser will appear.
Navigate to the desired map, selected it, and click Open. The map will be imported as a new Worldographer map.
Export Image (Ctrl+E)
This option enables the author to save the current map as an image (graphic) in PNG format. The entire map is saved, and this functions exactly the same for all map types. It uses the current size settings of the map. (Tile width and height as well as number of hexes/squares high & wide.) If you want a larger map, increase the tile width/height.
When this option is selected, a dialog appears asking you for the desired DPI (dots per inch). DPI doesn’t affect how much information/how many pixels are in the image, but some image viewers, editors, and print programs use it to create the default view/size of your image. Then a standard Save As file chooser will appear.
Navigate to the desired location, enter a file name, and click Save to produce the graphics file.
The resulting file may be opened in using any program capable of opening PNG files.
Export Selected Area As Image
This option enables the author to save a section of a map as a image/graphic in PNG format. It functions similarly to Export Image.
Before using this option, first choose Edit | Select, then use the mouse to draw a rectangle on the map. (See below for more information on this option.)
Next select File | Export Selected Area As Image. A Save As file chooser will appear. Navigate to the desired location, enter a file name, and click Save to produce the graphics file.
Export To PDF
This option enables the author to save the current map as a Portable Document format (PDF) file. This action is similar to Export to PNG, except a PDF file is created, not a graphics file.
When this option is selected, a standard Save As dialog box file chooser will appear. Note: The dialog box indicates that a PDF file is being saved, not a PNG.
Navigate to the desired location, enter a file name, and click Save to produce the PDF file.
The resulting file may be opened in using any program capable of opening PDF files.
Export Selected Area To PDF
This option enables the author to save a section of a map as a Portable Document format (PDF) file. It functions similarly to Export Selected Area As Image (see above).
Before using this option, first choose Edit | Select, then use the mouse to draw a rectangle on the map. (See below.)
Next select File | Export Selected Area To PDF. A Save As file chooser will appear, although it indicates a PDF file is being saved. Navigate to the desired location, enter a file name, and click Save to produce the PDF file.
The resulting file may be opened in using any program capable of opening PDF files.
Export Notes/Information To HTML
This option creates an HTML file containing notes and generated information regarding the current map. This includes notes created by the author (see Update World/Name Data File for more information and Data | World Info menu item) as well as information generated by Worldographer.
Note: The information generated by Worldographer varies by map type. For World level maps, this includes kingdom and pantheon information, and for City maps it includes a description of all generated buildings and their inhabitants.
Warning: This action produces an HTML file along with graphics files. Especially for City maps, a large number of files may be produced. It is strongly recommended to create a new folder/directory to export the notes into.
When this option is selected, a standard Save As file chooser will appear. Note: The dialog box indicates that a HTML file is being saved, not a PNG.
Navigate to the desired location, enter a file name, and click Save to produce the HTML file along with any supporting files. The resulting file may be opened in using any program capable of opening HTML files.
Export as UVTT File
Worldographer 2025 supports the “universal virtual table-top map” format. As of this writing (November 2024) the format supports movement and light blocking walls and objects plus doors and windows. Note that any doors and windows must have a break in the wall. The format doesn’t seem to support hexes yet, but we hope to expand that soon.
Check/Update License
Selecting this option checks the state of the license for Worldographer’s world/kingdom functionality.
Check/Update Battlemat/Dungeon License
Selecting this option checks the state of the license for Worldographer’s settlement functionality.
Check/Update City/Village License
Selecting this option checks the state of the license for Worldographer’s battlemat functionality.
Exit
Closes the program. If any map files that were previously saved have been changed, you will be asked if you are sure that you wish to quit. You can also use the “Close” button in Worldographer’s menu bar–the icon varies based on your Computer’s operating system.
Edit Menu
Some options have a keyboard shortcut – if an option has a shortcut it is displayed to the right on the option in the menu, and if also shown in this document.
Select Map Area (Drag Mouse)
Choose this option to turn Select on or off. A checkmark next to the menu option indicates that Select is on.
This action works on maps. Use the mouse to draw a box on the screen, e.g., click on a point and hold the left mouse button down. Drag diagonally – a light yellow box will appear to show the area selected, Release the mouse button when the desired area is highlighted.
Alternately, click a point on the map and then click other points to select an irregularly shaped area.
Note: When selecting an irregularly shaped area, all points selected must be to the top/bottom and/or left/right of the original point. If a point is selected, then another point above and to the right is selected, and then a third point below and to the left of the original point, the results will be unpredictable.
Once an area is selected, the Cut, Copy, Paste, Undo, Redo, and Delete actions in the Edit menu will act upon that area.
Warning: As mentioned above, Select is a toggle (on/off) option. When the desired action(s) are completed, unselect the option to avoid unintentional changes.
Cut/Copy/Paste Options
This sub-menu is new in the 2025 version of Worldographer.
Align Paste With Grid: If selected, when you paste it will line the pasted object up with the grid within 25% (on the grid lines or 25%, 50%, or 75% shifted). Some trial and error (undo & redo, see below) may be needed to get it just right.
Exclude Terrain, Terrain on non-Terrain Layers, Features, Shapes, & Labels: These options are applied when you cut, copy, or delete. When you paste, whatever objects were cut or copied are pasted.
Cut (Ctrl+X)
This action cuts the selected area to the clipboard.
Copy (Ctrl+C)
This action pastes the selected area to the clipboard.
Paste (Ctrl+V)
Before using this action, select an area of the map.
This action pastes a cut or copied map selection into the current map. The pasted section is positioned so that its upper left corner is in the upper left corner of the selected area.
Undo (Ctrl+Z)
This action reverses the last change made to the map.
Redo (Ctrl+Y)
This action executes again the last change made to the map.
Delete (Delete)
This action deletes the selected area.
Options Menu
Auto-Update Other Map Levels
This option affects only World, Continent, and Kingdom outdoor maps.
As described in the Map Levels section of the Creating World/Kingdom Maps page, World/Kingdom scale maps can be related.
When this option is checked, a change made to one map level will be automatically added to the other levels. For example, a city placed on a Kingdom map will be similarly placed on the Continent and World maps – if those maps already exist.
Show Details on Hover
When selected, as your mouse moves over the map it will display the terrain info of the terrain the mouse pointer is hovering over. If there is a feature at that location, it will show details of that feature. Note that some other settings may interfere with this. For example, the various Select buttons: Select Feature, Select Shape, etc.
Select Shapes by Clicking Inside Polygons
By default in Worldographer, shapes are selected by clicking on the points that make up the shape. These are shown as small grey circles when you click the “Select Shape” button on the Shapes drawer. Once a shape is selected only the selected shape’s points are shown (as blue dots, with a green and red dot at the beginning and end). However, you can choose to select shapes by clicking anywhere inside them as well (useful for polygons and ovals/arcs) if this is selected.
Use Similarly Named Features When Dragging to Place Them
If this is selected when dragging to place features, similarly named features will occasionally be swapped instead of the one chosen. For example Medieval Inn A may also result in Medieval Inn B or Medieval Inn C if both are loaded in the system.
Scroll Wheel Zooms In/Out
When this option is checked, the mouse scroll wheel will zoom the map in/out, e.g., change tile size. This action occurs only when the mouse pointer is over the map.
Add Randomness To Terrain Fills/Children
If this option is checked, when doing paint bucket fills, creating child maps, and using the terrain wizard, Worldographer will add randomness to the new terrain. For example, if the original terrain is light forest, there may be a few heavy forest terrain or forested hills terrain added.
The final result of this action varies by map size and behind-the-scenes technical factors, so the exact results vary.
Autosave (File~.wxx)
When this option is checked, Worldographer will automatically save the current map to file every 5 minutes, using the map’s filename with “autosave” appended.
In situations where a non-reversible action is performed on the current map, the author may open the autosaved file to recover.
Note: Authors should manually save their work periodically and always save before all major changes.
Tools Menu
The contents of this menu changes depending on what map type is active.
Expand/Shrink Columns/Rows
This tool allows the author to increase or decrease the size of a map.
Selecting this tool displays a dialog box that resembles similar to the following:
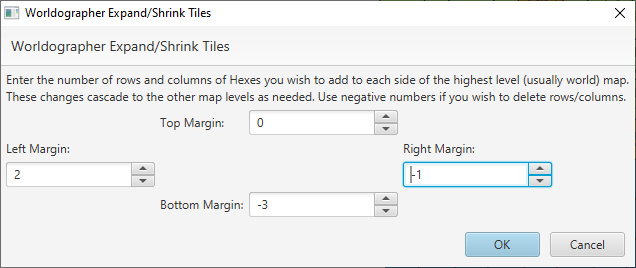
Enter the number of tiles to increase or decrease each side of the map:
- 0 margin does not change that margin.
- Positive number increases the size of that margin.
- Negative number decreases the size of that margin.
For example, create a 10×10 map which may resemble the following:
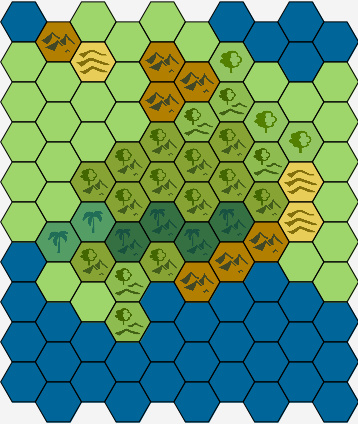
Select Tools | Expand/Shrink Columns/Rows, and enter these values:
- Left Margin 2
- Top Margin 0
- Right Margin -1
- Bottom Margin -3
Click Ok, and the map will be resized and resemble the following:
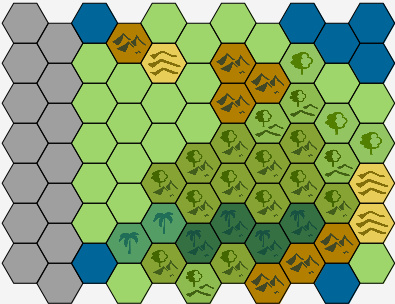
Two blank columns of tiles are added on the left, no changes are made to the top, one column of tiles is removed from the right, and 3 rows of tiles are removed from the bottom.
Warning: This action is permanent and cannot be undone! Save the map before resizing!
Terrain Wizard
This tool fills in blank areas on a map.
Note: This tool works on World/Kingdom maps. It does not work for City/Village or Battlemat/Dungeon maps.
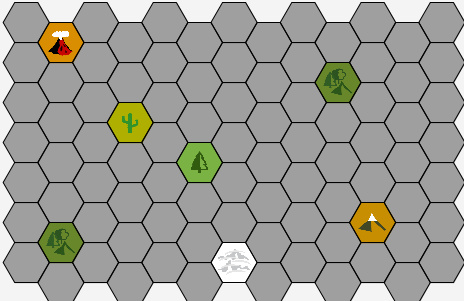
To use it, create a map and place terrain in various places on the map. Something like the following:
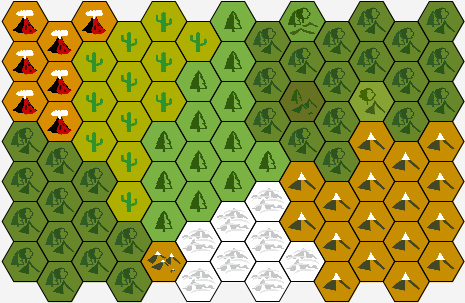
Select Tools | Terrain Wizard. This tool will randomly fill blank tiles with terrain features in nearby tiles. This is random on the where multiple terrain tiles are the same distance as well as if Options | Add Randomness to Terrain Fills/Children is selected. Repeated use on the same map will not normally produce the same results twice. The resulting map may resemble something like:
Switch Terrain To Isometric Style
(World/Kingdom maps only.) Selecting this finds the Isometric version of as many Classic terrain types on the map as possible and switches the Classic icons to Isometric style
Switch Terrain To Classic Style
(World/Kingdom maps only.) Selecting this finds the Classic version of as many Isometric terrain types on the map as possible and switches the Isometric icons to Classic.
Switch Icons to Realistic Style
(For battlemat maps only.) This switches as many line art style icons to realistic as possible.
Switch Icons to Simple Style
(For battlemat maps only.) This switches as many realistic style icons to line art as possible.
Make Isometric Mountains Feature
If you have an isometric map and made your mountains as terrain, this option will switch all mountain terrain to “base” terrain (just a textured ground effect) with Mountain “features” above it. This results in a denser looking chain of mountains and mountains that aren’t locked into the center of each terrain hex.

Map Key
This menu option opens a dialog similar to the following:
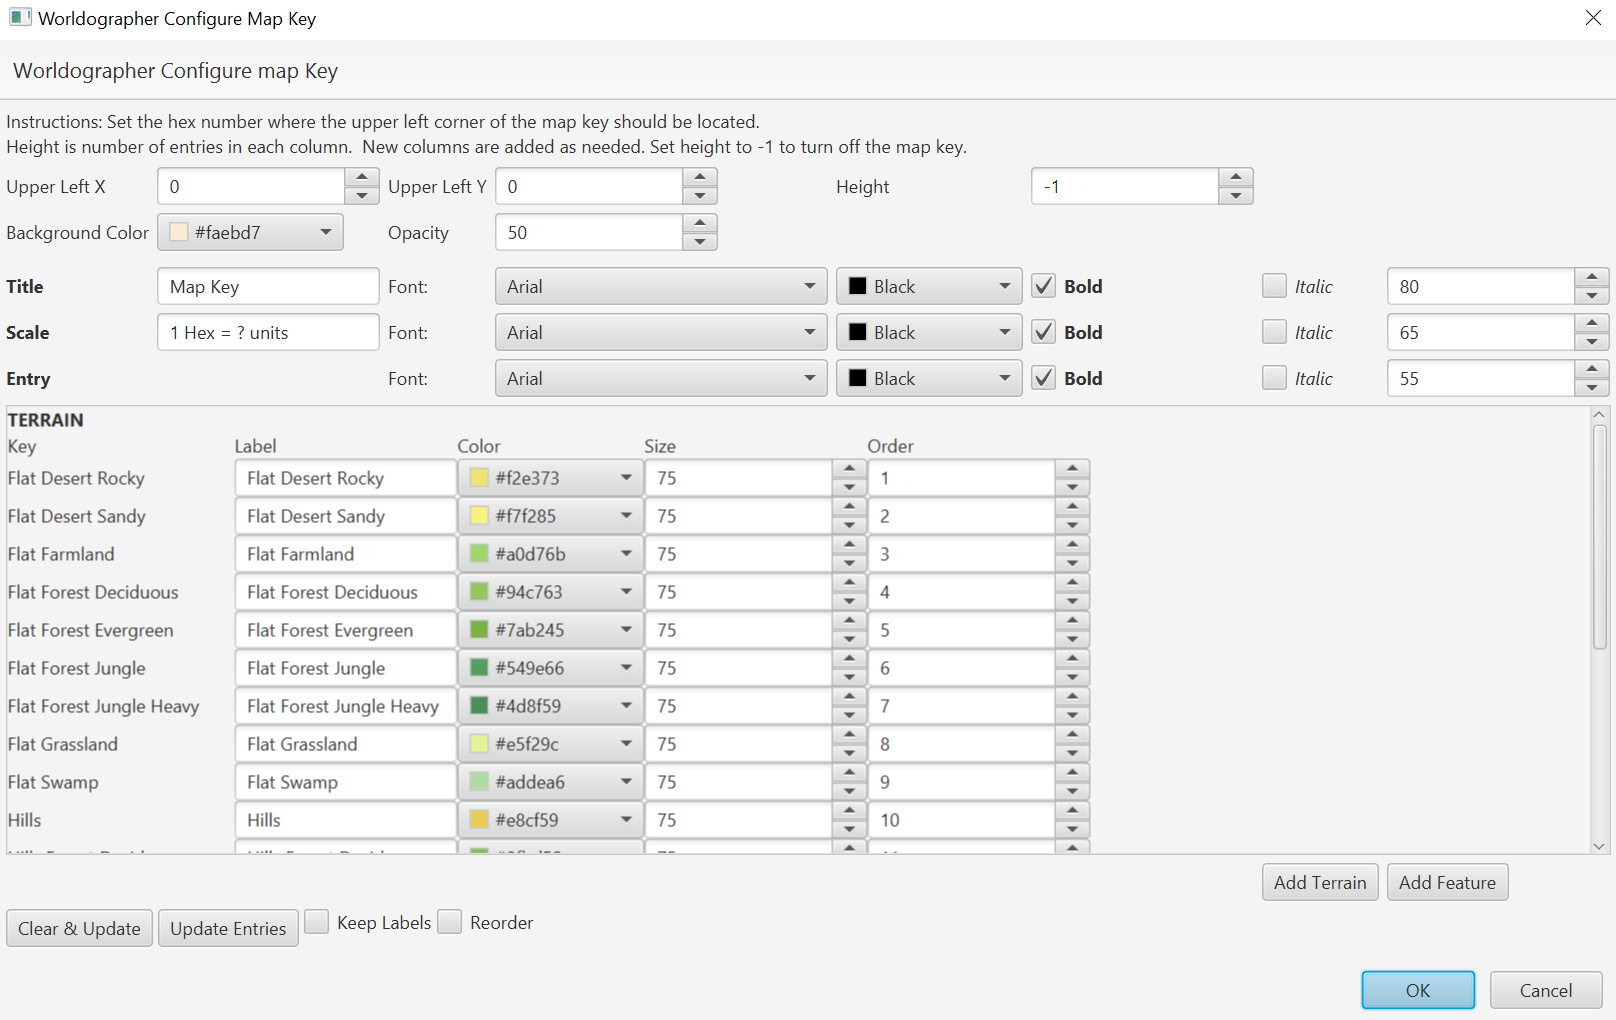
This dialog allows you to add a map key to the map. It is important the that height value in the upper right corner is greater than 0–otherwise the map key won’t appear. The system auto-populates the terrain and features section (the features section is not shown in the diagram, but below the terrain in that scroll area) with whatever terrain is currently on the map. You’re able to add more using the Add Terrain and Add Features buttons on the bottom right. Here are details for each field:
Upper Left X & Y & Height: The X&Y represents the tile coordinate for where the upper left corner of the map key should be placed. The height is how high the map key will be–if more room is needed, another column will be added to the key. If this is -1 or 0, no map key is added to the map.
Background Color & Opacity: The map key is displayed above a boxed area. This color & opacity is used for the boxed area.
Title & Font: The title of the map key and choosers for the font (face/name, color, bold/italic, the title’s height as a percentage of a hex/tile).
Scale & Font: Text for a note about the map’s scale and font selectors similar to the font settings for the title.
Entry Font: The font used for each entry in the map key, similar to the font settings for the title.
Terrain Fields (Key, Label, Color, Size, & Order): Each terrain used on the map appears here by default. You can use the Add Terrain and Add Feature buttons below to add more if you plan to use others or if you’ve added others to the map since creating the key. The Key is the name of the terrain type in the system, it can’t be changed. The Label is the text which will appear on the map key. Color is the background color used on the map key for this entry. By default it matches the terrain’s background color, but you can change this if needed (for just the key). Size represents the icon’s size as a percentage of a hex/tile. Finally Order is used to order the entries.
Feature Fields (Key, Label, Size, & Order): Similar to the Terrain Fields, except there is no background color. Also, note that the Order column is all one ordering for Terrain and Features.
Clear & Update: Clear the existing settings and recreate the Map key terrain & features settings based only on what is currently on the map.
Update Entries: Keep all the existing entries in the map key and add any terrain and features on the map but aren’t in the map key.
Keep Labels & Reorder: These two checkboxes are used for both the Clear & Update and Update Entries buttons. Keep Labels will ensure any labels that have been revised won’t change. Reorder allows the system to reorder all the terrain and features when the key is updated.
Add Terrain & Add Feature: These two buttons let you add more rows for additional Tterrain and features respectively.
Configure Menu
Save Configuration
Save the current values for terrain, features, line styles, and textures.
Load Configuration
Load a saved configuration that has settings for terrain, features, line styles, and textures.
Show Configuration Folder
Worldographer allows you to add custom features, terrain, and textures by simply dropping them in a specific folder. More details are described in this instruction page. By default, this is a Worldographer folder of your user folder. Ex: c:\Users\George\worldographer
Change Configuration Folder
If for some reason you can’t or don’t want to use the default configuration folder, this option opens a file chooser to pick a different folder.
Add Custom Terrain
The option allows you to add a new Terrain via a file chooser. You can add one or several at a time. You may want to follow the naming convention from the instructions page to get the background color and elevation set by default. However, in the 2025 version, you’ll see a dialog like the one below which will let you set size, background color, and elevation for each new terrain. You may later use the “Configure Terrain” option on this same Configure menu below to adjust terrain.
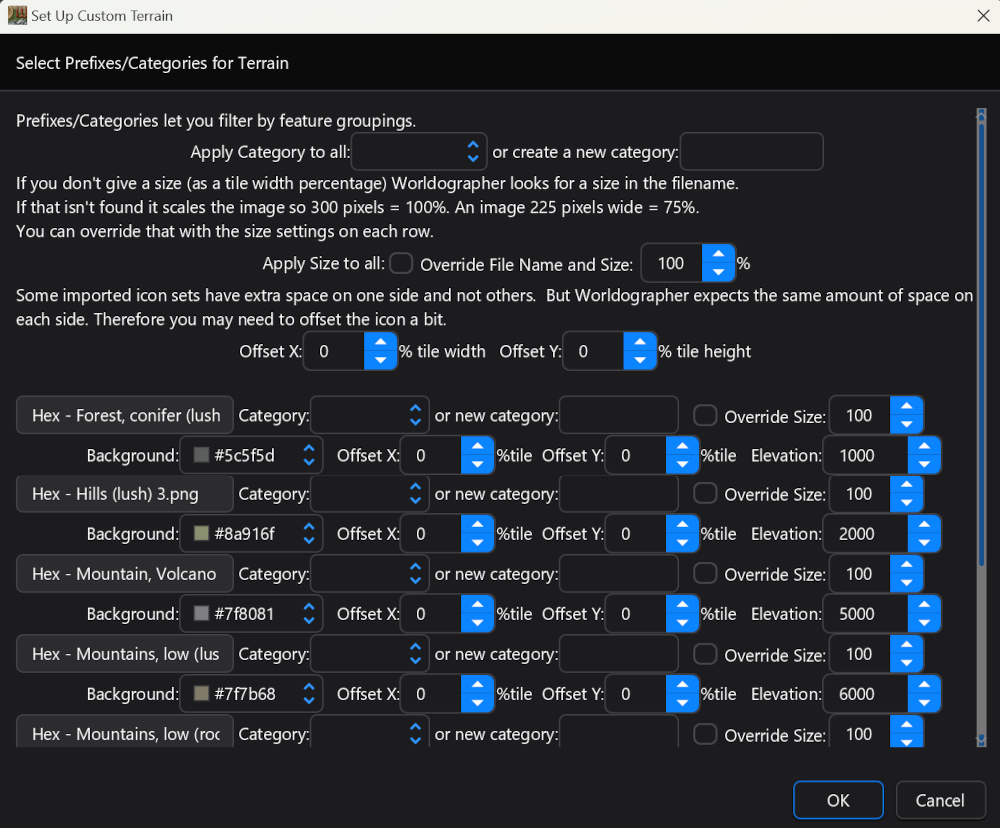
More details about each field on this dialog:
Apply Category to all: Select one of the categories already in Worldographer for all the new terrain.
Create a new Category: If you want to give all the terrain a new category not already set in Worldographer, enter it here.
Apply Size to all: If selected, the next field will have an effect.
Override File Name and Size: Set the icon’s size as a percentage of a hex’s size.
Offset X: Some icon sets aren’t assumed to have the icon centered in the hex. If you need to shift it horizontally, try this.
Offset Y: As with Offset X, but this lets you adjust the icon vertically.
Each individual terrain can have its specs changed in the rows below. All have the same meaning as above, except the following two additional fields:
Elevation: The default elevation of the terrain. This varies when the terrain is placed to add some randomness, and it will be adjusted based on the adjacent terrain. So a mountain in the center of several other mountain hexes may be much more than the default.
Background: The color placed behind the icon. Some terrain is made such that the icon is only a portion of the hex. This lets you set that background color. The default is either based on the color codes in the filename (see this page) or else Worldographer picks 8 points in the image and averages the color of those points.
Add Custom Features
Similar to the Add Custom Terrain option, but for Features.
Add Custom Textures
Similar to the Add Custom Terrain option, but for Textures.
Configure Terrain
Because there are a lot of terrain icons built into Worldographer, this first opens a dialog prompting you for which type of icons you’d like to configure. Once you choose that, you’ll see a dialog like this one:
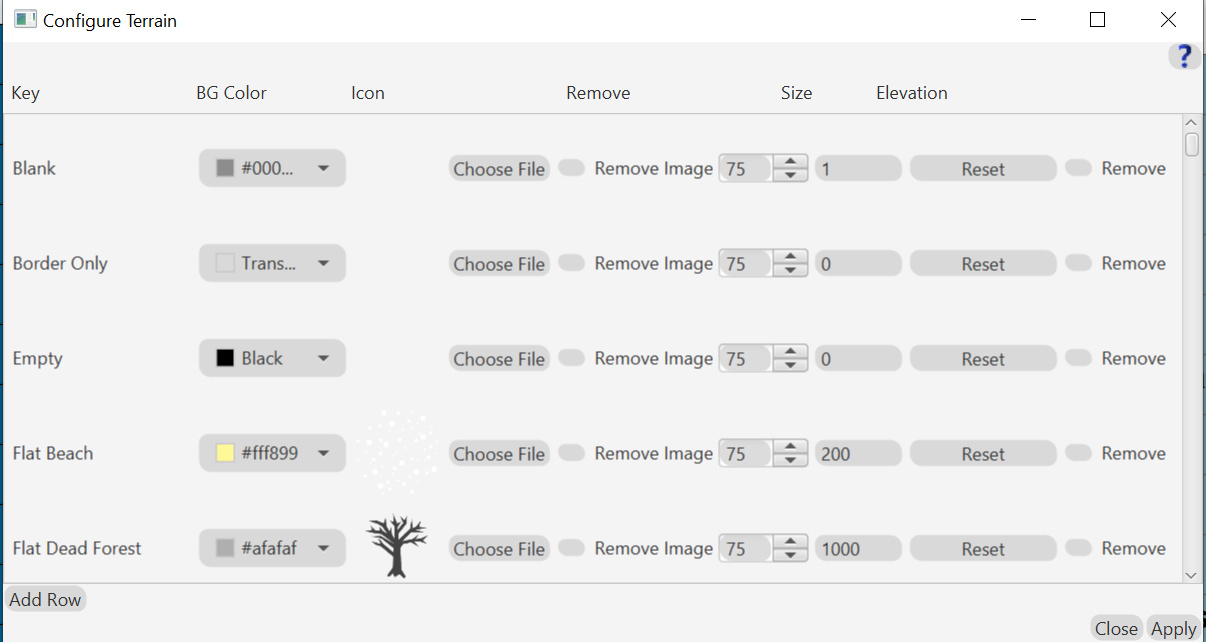
The list will likely be a long one. Here is a guide to each column in the chart and the buttons below:
Key: The name for this icon. (Can’t be changed.)
BG Color: A color picker for the background color of the terrain.
Icon: Shows the icon of the terrain. A “Choose File” button (which opens a file chooser) allows you to change it to something else.
Remove Image: Click this box and then the image will be removed when you next click “Apply” below.
Size: The icon’s size on the screen as a percentage of a hex or tile on screen.
Elevation: The default elevation of this terrain type, in feet. (Only used to ensure rivers usually go downhill. These elevation values are averages for the entire tile, so a river could go up to a slightly higher elevation–but it is a lower part of that other tile.)
Reset: This will reset the values of this row immediately. (You don’t have to click “Apply”.)
Remove: Removes this row when you next click “Apply”.
Add Row: Adds a row to the list at the bottom. The scroll bar does scroll to the new value at the bottom. Depending on your system, you may need to scroll a bit further.
Close: Closing the window without saving changes since you last clicked “Apply”.
Apply: Save any changes you’ve made.
Configure Features
As with “Configure Terrain” this option first opens a dialog prompting you for which type of features you’d like to configure. Then a dialog similar to the Configure Terrain dialog above appears. The only notable difference it there isn’t a BG Color field because features don’t have background.
Configure Textures
Unlike Configure Terrain and Configure Features, this does not prompt you for a type to configure first. It simply opens a dialog much simpler than the Configure Terrain dialog above. It only has the following columns: Key, Icon, Reset, and Remove. It also has Add Row, Close, and Apply buttons.
Configure Settlement Data
Settlement data is used primarily to populate settlements (cities, towns, and villages). This menu item opens a dialog to edit the data. See this video for more details.
Configure World & Name Data
Worldographer generates information about the world (nations, religions, and cultures) when you create a world/kingdom map. It also generates information about each city, ruins, castle, etc. when you first select that feature on the map and see the Notes for it. Likewise, when generating a settlement, every building has occupants and these names are created using the values here.
More details coming soon.
Generate Menu – World/Kingdom Maps
The Generate menu varies based on what type of map you have open.If you’re editing a battlemat or cosmic map there is no Generate menu because the generators for these maps don’t apply to already created maps. This section details the options for World/Kingdom maps. Settlement map options are listed in the next section.
(Re)Generate Map Level
Pro feature only. Allows you to create a more detailed child map level or a less detailed parent map level. Choosing this opens a dialog asking what map level to base the new level on. Then a second prompt asks how many hexes to place per hex in the parent map. This number is the number of hexes across per parent map hex. So choosing 6 hexes across will actually make 36 hexes per parent map hex.
–Delete Map Level
This option allows you to delete a map level so you may re-create it if you wish.
Generate Coasts
Selecting this prompts you for a type of coasts to add to the current map level. You may pick “Feature” style icons in either our classic (flat color) style or our isometric (textured) style or “Shape” style coasts which are colored or textured polygons. For Shapes, the system will automatically use flat colors or textured depending on what terrain your map uses. If you have our “Ring Lord” icons installed, there will also be a flat color feature matching that style.
If you plan to use the world/continent/kingdom/province mapping functionality to drill down in the map, it may be better to use shapes instead of features for your coasts. When creating a new more detailed map level, Worldographer has no way to determine the exact bend of a given coastline feature, so it can’t add the correct extra features to match the shape of the coast on the other level. Shapes on the other hand are made via a series of points on the map so Worldographer can multiply each shape’s points when creating the new level. If you use features, you’ll have to manually pick and place new features for each map level.
–Delete All Coasts
Deletes every feature or shape that has the tag “coast” from the map.
Generate Rivers
Selecting this prompts you for a number of rivers to add per 10000 tiles (100×100, for example) on the map. So if the map is 200×100 tiles, and you pick 15 in the drop-down, it will try to place 30 rivers. It may not end up doing 30 rivers if it fails enough times. To get more rivers, you can always run this generator again on an open map via the Generate menu or hand place additional rivers.
The other adjacent drop-down lets you pick the type of rivers it will generate. If you pick either Shapes option, each river will be made up of several line shapes of increasing width as you get closer to the mouth of the river. Classic shapes have a flat blue color while Textured shapes have a blue texture which matches the Isometric tile set’s sea terrain. Both of these can be edited using the Shapes toolbox’s controls. If you pick Features the system will add more artistic looking Feature icons to make a river. These can be edited using the Features toolbox.
Note that as with Coasts, using features to make a river will make the world/continent/kingdom/province functionality a more manual process–you’ll have to hand place additional features on the other map levels.
Generate Nations/Empires
Selecting this prompts for a number of empires/nations equal to try to place on the map; a maximum #settlements/for each drop down; then a prompt to use different color for each border or just one; next a color if using just one; and finally an option for the border polygon to fill it with a translucent version of the color.
Generate Roads
Selecting this opens a prompt asking if the user wants to also connect villages and forts and a second checkbox for ruins. (Cities, towns, and capitals are assumed–if not already connected.) Next on the dialog is a “Line Type” drop-down with the following choices: “Straight” will create straight lines between the locations; “Fractal-ish” will introduce several points along the path that vary slightly from a straight line to make the line look more natural; “Curve will create a cubic curve (anchor point, then two control points, then another anchor point) between each location. Finally there is a color selector
The system then attempts to connect any cities/towns/villages and villages/forts/ruins (if selected) with a road of the chosen type & color. Each line will have the tag “road”. The system looks for this tag to avoid connecting the same two settlements again. You can run this once with a black/dark grey color for roads between major settlements, then run it again with a brown/tan color to show less traveled routed such as trails between villages and such.
Generate Hex Crawl Location
Selecting this opens a prompt asking for the percentage chance that each land hex will have a hex crawl location and a separate selector to choose the chance of a hex crawl location in water hexes.
Pressing “OK” will cause Worldographer to add the locations for the map. Each will have a “Feature” and most of the Features will have Notes. Select “Add/Edit/View” next to Notes below the map to see the notes (small squares). Click one to view & edit the details. You may also select the Feature (via the Features tab/toolbox’s Select button) then click “F. Notes” to see & edit the notes of a selected feature.
Regenerate Resources
All the terrain on the map has a few resource values assigned to it. These are percentages for Animal life, Brick, Crops, Gems, Lumber, Metals, & Rock. Each terrain type has a default amount and when placed in a specific hex is randomized somewhat. (You can see the values by turning on “Show Details on Hover” on the Options menu or by Selecting the terrain via the terrain tab/toolbox’s Select button then seeing the values in the fields toward the bottom of the terrain tab/toolbox.) Selecting this causes these values to re-randomize.
Generate Menu – Settlement Maps
As stated above, the Generate menu varies based on what type of map you have open. If you’re editing a battlemat or cosmic map there is no Generate menu because the generators for these maps don’t apply to already created maps. This section details the options for Settlement maps. World/Kingdom map options are listed in the next section.
Data Menu
Update World/Name Data File
Allows you to upload a file data for generating world information and names.
World Info
This menu item opens a dialog similar to the following:
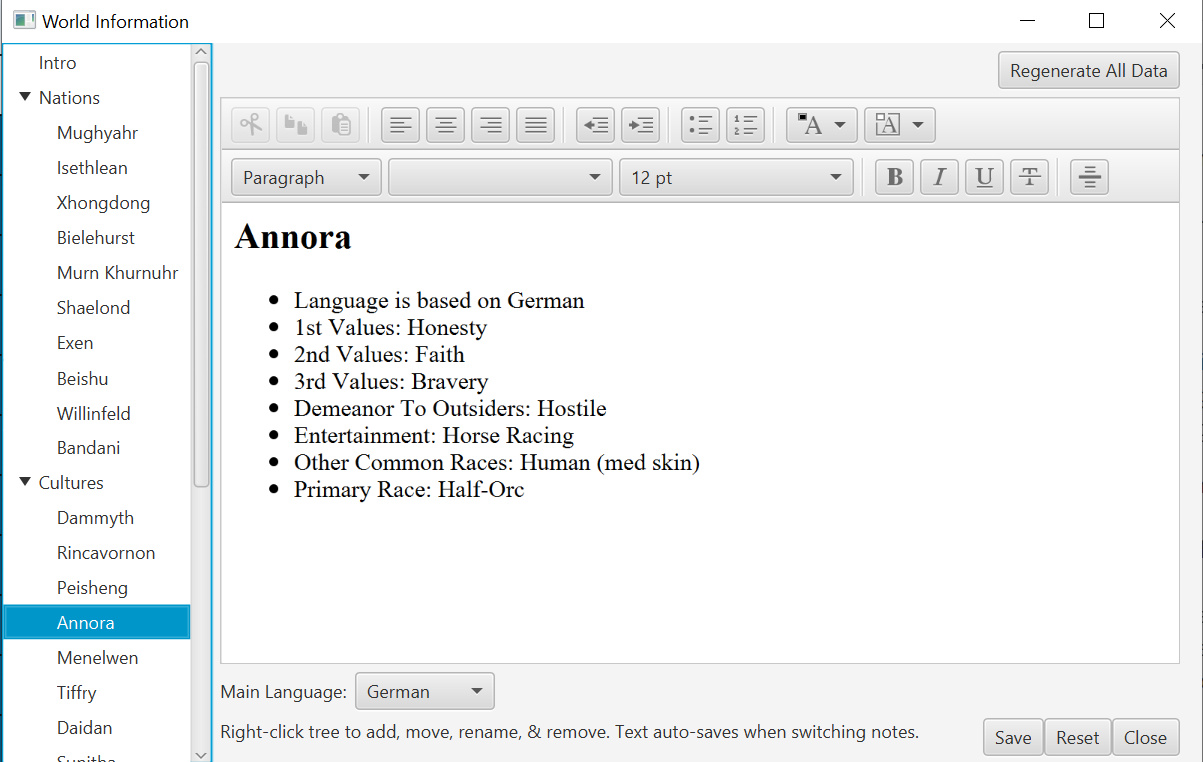
This data is generated by Worldographer when you create a new world/kingdom map. The system generates a number of cultures, for each of which a language is chosen (see the World/Name configuration screen for details). From these cultures, nations are picked and assigned as well as religions. Intro and Timelines entries are also added, although left blank.
Select an entry (intro, a culture, religion, nation, or timelines from the left side (expand the tree as needed) and then edit or replace the text as needed. New entries can be added to the left side by right-clicking a value in that area and choosing “Add Child”, “Add Before” or Add After”. Other options on the right click menu allow you to reorder the entries or remove them.
The main text area has a number of controls similar to many word processors. Above it and to the right is a button that allows you to regenerate all the data for all of the entries. Below the text area, for a Culture, the a selector near the bottom lets you change the Language; for a Nation or Religion, you use a similar control to pick a Culture.
The dialog has Save, Reset, and Close (without saving since you last did) buttons on the bottom.
Terrain Stats
This menu item opens a simple dialog with a list of terrain used in the map, how many of each, and the percentages.
Help Menu
License
This opens a dialog displaying the End User License Agreement.
Show Log
This shows some debug information of what Worldographer is doing. If you report a bug, we may ask you to copy & paste the text from this window.
Show Memory Usage
This opens a dialog showing Worldographer’s memory usage in Megabytes The memory free is the amount of memory of the total that is currently free. The total is the most that Worldographer currently has allocated. The Max is the most Worldographer is allowed to allocated. So if Worldographer has a Total of 2256, and has 526 free, and a Max of 24400, then it is using 2256-526 = 1730MB, and as it uses that, it can allocate about 22000MB (around 22GB).
Note, before Worldographer 2025, this information was near the mini-map.