07f. Fog of War/Explore & Trace Underlay Drawers
Overview
These two drawers aren’t used by everyone, but offer very compelling functionality to try. Fog of War/Explore allows you to hide the map and reveal portions to your players as you play the game. Whether in person on a monitor or on-line with a screen sharing application. (We personally use it with Discord’s voice chat & screen sharing.) Trace Underlay allows you to quickly copy a map into Worldographer’s style.
Fog of War/Explore

Note: You need to make sure the “Show GM Only Items” checkbox on the “View Options” drawer is unchecked for the Fog of War feature to work properly. Otherwise, that setting is forcing all of the map to be shown, regardless of what you do here.
Select Area
Select an area by clicking the Select Area button then click-dragging an area on the map or clicking the points of a polygon on the map. The selected area will turn yellow. This area can either be set as the only area seen or the area hidden (see below). The area hidden or seen will be tile-based (hex or square, depending on map type). If the selected area touches any portion of a tile, it is in the selected area and will be hidden/seen.
Temporarily Show All
In case you lose track of what is where, you can toggle this on and off to show all the tiles on the map. Don’t forget to hide your screen from your players first. Press this button again to deselect it and all the tiles that were hidden will be hidden again, including any changes you made (added hidden/shown tiles) while it was selected.
Hide All But Selected
Usually, once you select the initial region that the PCs know, click this to hide the rest of the map. After that first use, you usually don’t use this button again unless there is some reason the PCs would forget an area and you want to start the exploration over.
Show Selected
This is probably the most commonly used button here (along with select area, which can be left on). Once you already have the next area the PCs can see selected on the map, click this and that area will be shown.
Hide Selected
Did you accidentally reveal too much of the map? Or is there a reason the PCs no longer know an area? Select an area on the map and then click this button to hide that region.
Trace Underlay Drawer
As stated above, use the functionality of this drawer if you have an image of a map (.jpg or .png usually) and want to make a new version in Worldographer. In general, you start with a blank map of the approximate number of tiles you want, open this drawer, select your file, then do some trial and error with the other fields to line up the underlay image. Here is what the drawer looks like:
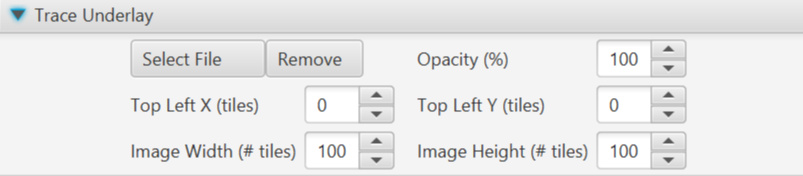
Select File Button
This button opens a file chooser to let you select an image file (jpg, png, or gif) which is then placed under your map. If you can’t see it, make sure “Opacity” isn’t set to 100% (maybe try 50%, see below) and make sure you have the map area you’re viewing matching where the image should be placed. For example if the Top Left X and Y are set to 0, make sure you’re looking at the top left corner of your map.
Remove Button
Allows you to remove the image underlay.
Opacity Number Field
Controls how “solid” (vs. semi-transparent) the map your editing is so you can see the underlay image below. A value of 100 won’t let you see the image below. A value of 0 won’t show the map you’re editing at all.
Top Left X & Y (tiles) Number Fields
Set the location of the upper left corner of the image being traced via these fields. Decimal and negative values are allowed. (Negative numbers allow for part of the image to be off the map in case the image has a border or other information on it.) Each X value of 1 will bump the image over one tile column. Each Y value of 1 will bump it down by one tile row.
Image Width & Height (# tiles) Number Fields
Set the image’s width and height with these fields. The image’s width or height will span the number of rows or columns of tiles that you specify in the width and height fields respectively. You can include decimals, but not negative numbers. The results can push part of the image off the map in case that section isn’t needed.