05. Creating Settlement/City/Village Maps
This screen covers all the settings needed to create a new settlement map, whether you want to make a small village or large city. Worldographer gives you three main ways to create a settlement map depending on how much you wish to customize the map:
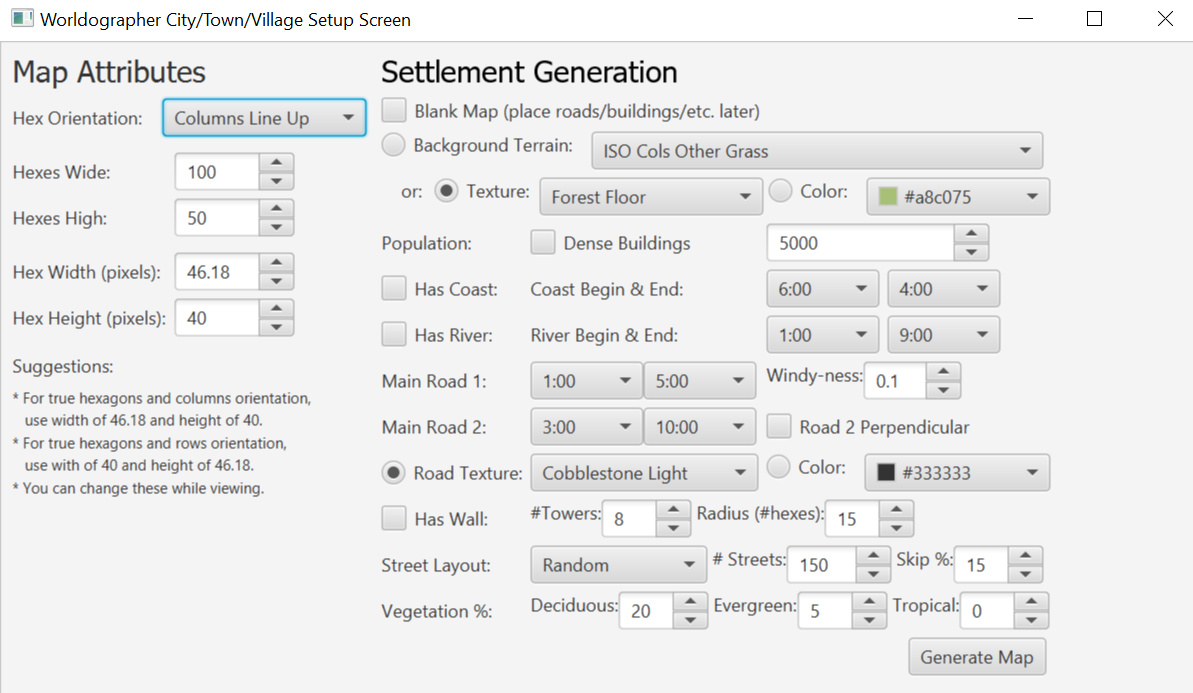
- The fastest way is to simply make changes to settings on the main City/Town/Village Setup Screen (shown below), including un-checking the Blank Map checkbox, then let the system make a random settlement for you based on those settings. This finishes usually within a minute, but with a high population of if you have a relatively small number of hexes it can take longer to try to place everything. Note: You should change the “Street Layout” setting to Haphazard or Branching. If not, if an Ordered or Very Ordered layout is chosen if the Main Roads aren’t set properly, the generated settlement may look skewed.
- On the opposite extreme, you can start with a blank map and hand place every road, river, building, and other feature. Once the blank map appears, use the Shapes drawer to create any waterways, roads, etc. Then use the Features drawer to place buildings, vegetation, and other items.
- Third is a hybrid approach where you start with a blank map, then go to the Generate menu (which appears once you have a map open) and pick Generate Coast, change the settings in the dialog and see the results. This lets you undo/redo or customize (move the points of the coast in this case via selecting the coast’s shape using the Select button on the shapes drawer) the results of that step. Then you can do the same for Generate River, Main Roads, Wall, Streets, Buildings, and Vegetation. In each case you can customize the results before moving on to the next step.
To generate a map, change the settings as desired (see below for a description of all options), and click the Generate Map button. A dialog box showing the settlement creation progress will appear. You may click the Cancel button in the dialog box to stop map creation.
Hex Orientation, Hexes Wide and High, Hex Width and Height (pixels)
These options function exactly as the same options when creating a world/kingdom map. See the Creating World/Kingdom Maps page for details.
Blank Map Checkbox
When this checkbox is selected, the generated map is filled with a single Background Terrain, Texture, or Color. The default value is the Forest Floor texture.
When using a blank map, the author may then place roads, buildings, etc. as desired. Alternately, the options in the Generate menu may be used to generate Coasts, Rivers, Roads, Walls, Streets, Buildings, and Vegetation. Note: The Generate menu is visible only when a map is displayed.
Background Terrain, Texture, and Color
These radio buttons enable the author to select the background for the generated map. Select the radio button of the desired background type (Terrain, Texture, or Color) and then select a choice from the associated drop-down list.
Note: The background will be generated for both Blank and non-Blank maps. A texture or color background is created as a shape with the chosen fill texture or color. A terrain background is achieved by setting all the terrain hexes to the chosen type.
The remaining options on this dialog box are for generated maps. If Blank Map is checked, these will be ignored.
Population Field
The Population value is used as the basis for the number of buildings that will be placed on the map. First, Special Buildings (inns, temples, blacksmiths, etc.) are placed. See Configure Settlement Data in the Configure menu for information regarding special buildings.
Next, the population value is divided by 4 and the result is the number of additional buildings to place. The placement of additional buildings is dependent upon map size – if the map size is fairly small (50×50 for example) and the population is 10,000, Worldographer cannot fit 2,500 buildings into the indicated space. As many buildings as possible will be placed. The algorithm can also become slow if you attempt to place many more buildings than there is space/roads to use as placement locations. It tries to place each building several times, and uses a good bit of geometry to find a placement, ensure the building isn’t overlapping any other building or a road or water, etc.
When the Dense Buildings checkbox is selected, the buildings near the city center will be placed close together.
Note: Without a Pro license for Settlement maps, this value is capped at 5000 people.
Has Coast Checkbox & Clock Position Drop-Down Lists
When this checkbox is selected, the generator attempts to add a coast beginning at the clock position chosen in the first drop-down and ending at the clock position of the second. For example, a coast beginning at 9:00 and ending at 4:00 would start at the middle left of the map and extend clockwise across the top of the map and end over halfway down the right side.
Has River Checkbox & Clock Position Drop-Down Lists
As has coast, but the river begins at one clock position and crosses the map to end at the other clock position.
Main Road 1 Clock Position Drop-Down Lists
Settlements are centered where two roads cross. The first road will start at the first clock position and cross the map to end at the other clock position.
Windy-ness Number Field
Windy-ness enables the map creator to indicate how straight or curvy the roads are:
• Value = 0; main roads are straight
• Value = 1; main roads have some slight bends
• Value = 5; main roads meander
The Windy-ness spinner allows values of zero and above. Note: Values above 5 do not change the windy-ness much.
Main Road 2 Clock Position Drop-Down Lists & Road 2 Perpendicular Checkbox
This functions like Main Road 1, where the author may indicate the starting and ending positions of the road. However, if Road 2 Perpendicular is selected, this road will be perpendicular to Main Road 1, and the starting and ending positions will be ignored.
Road Texture and Color
The Road Texture and Color radio buttons enable the author to choose texture or color for the roads. Select the desired radio button and then select from the associated drop down list or color picker.
Has Wall Checkbox
Select this checkbox to generate a wall around a portion of the city. Main roads go through the wall and a gatehouse is placed where each road passed through the wall. Secondary roads do not pass through the wall and are either inside or outside the wall.
#Towers Field
# Towers indicates the number of guard towers that will be placed on the wall. These will be evenly distributed.
Radius (#hexes)
Radius (# hexes) indicates the distance (in hexes) the wall will be from the center of the city. Note: If the wall does not fit on the map, it will not be drawn, and the final status message will state that the wall was not placed. As the city is typically placed off center in the map, the best rule of thumb for walls is to set the wall radius to no more than 1/3 the smallest dimension of the map.
Street Layout
Worldographer generates different types of street layouts for secondary streets, from very ordered (grid-like) to haphazard (disorganized). Note that this setting does not affect Main Roads 1 and 2, only secondary streets. The author may select from the following choices:
- Haphazard: Secondary streets are very disorganized, providing a plausible result that grew as the town needed new roads, with no planning.
- Branching: Similar to Haphazard, excepting the streets grow off each other, expanding as new buildings were added in available space.
- Ordered: Streets are parallel to the main roads and a second set of streets are perpendicular to the first set of secondary streets.
- Very Ordered: Produces two sets of streets, one parallel to the Main Road 1, the other parallel to Main Road 2.
- Random: Randomly select from the previous 4 options.
#Streets
This indicates the number of streets Worldographer will attempt to draw. Note that while Worldographer will attempt to meet the request, some situation are impossible, e.g., 100 streets on a 20×20 tile map. In cases such as this, the application will draw as many as will reasonably fit.
Skip Chance %
When the Street Layout is Ordered or Very Ordered, a grid-like street layout is produced. Skip Chance % is the likelihood that a street in the grid will be skipped and not drawn. This produces a double-size block. If the Street Layout is Haphazard or Branching, this value is ignored.
Vegetation Number Fields (Deciduous, Evergreen, Tropical)
The mapmaker may set the percentage of free space that will be filled with Deciduous, Evergreen, and Tropical vegetation. Note: Buildings and other features are placed first, then vegetation. Small maps and/or maps with many other features may be filled enough with other objects that the application cannot place as much vegetation as desired. In this case as much vegetation as possible will be placed.