How to Import a Worldographer Map into Roll20
Loading a Worldographer map into Roll20 isn’t exactly intuitive, partly because of some different terminology and partly because Roll20 uses a square grid behind the scenes, even if you switch it to a hex grid. But follow these guidelines to make the process easier.
Exporting from Worldographer
On Worldographer’s Create New Map window are some sizing info/guidelines. For example, if making a regular map with hexes oriented as “columns line up” (what Roll20 calls Hex(H)), we suggest you make your hexes 46.18 pixels wide (corner to corner) and 40 pixels tall (flat side to flat side). If you’re doing “rows line up” (what Roll20 calls Hex(V)) use the reverse: 40 pixels wide and 46.18 pixels tall. Roll20 seems to have a default size of 70 pixels, but that is the square size and we’ll be resizing things anyway so you don’t have to do 70 pixels. If you want to resize to match, use 80.83 tall x 70 wide for rows line up or vice versa for columns.
Exporting at a smaller hex size will give you a lower resolution and smaller file. See what looks good to you. The difference between 40 and 70 pixels on screen will likely start to pixelate but not be too bad. 20 vs. 70 will definitely pixelate. Something close to 70 will hardly be noticeable.
Note: To change the hex sizes on an existing map, look for the Tile Width and Height settings under the mini-map. If you keep “Preserve Aspect Ratio” near those settings turned on, as you change the width the height will adjust automatically and vice versa.
If you have an isometric map, to trick the viewer’s eyes Worldographer squishes the hexes. We don’t see a way to squish the hex grid in Roll20. Therefore, it may be best to not use Isometric maps with Roll20, or at least don’t use the Roll20 grid for isometric maps. (If you don’t use the Roll20 grid and want to move tokens: hold down the alt key as you move tokens so they aren’t locked to the grid.)
Once you have the map sized as you wish, go to the File menu and select “Export Map” to get a PNG image.
Setting up the Roll20 Map
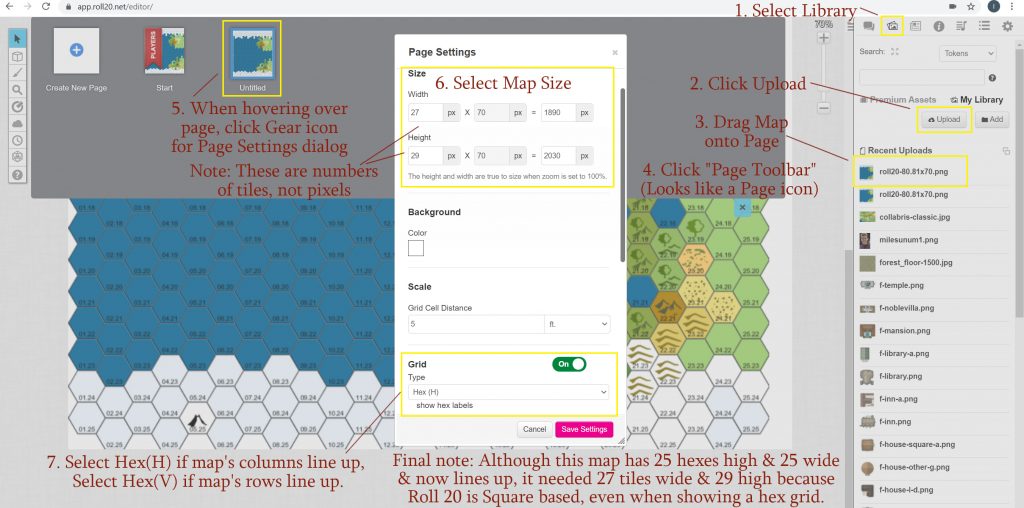
We (Inkwell Ideas) don’t know everything about Roll20, and what is there now may change. So please check Roll20’s instructions for details of everything here. But in general, Go to the Page Toolbar and click the Settings gear when you hover over the page. (Create a page first if needed.) Set the map to be the expected width & height. At the moment Roll20 has a bug where the number of rows & columns are showing with “px” (pixels) next to them. But under Width and Height the first value is the number of tiles and the second is the number of pixels per tile. We’ll likely have to come back to this. Further down the settings you can set the Grid Type.

Importing to Roll20
- Go to your Art Library.
- Click the “Upload” button in your library to import the image.
- Drag it onto the page.
- Click the “Page Toolbar” (it looks like a page icon in the upper right of the main area).
- When hovering over your page, click the Gear icon for the Page Settings dialog.
- Select the map size. Roll20 will let us scale the map, so these numbers don’t need to be exact. Set the width and height to a number of tiles a little more than the number of hexes. We need a little extra room because of the staggered nature of the hexes. Remember Roll20 uses a square grid behind the scenes even if it is displaying a hex grid.
- Set the Grid to Hex(H) if your map’s columns line up, or Hex(V) if the rows line up.
- Click your map and then drag the sides and top and bottom to get the hexes to line up. Hold down the Alt key as you drag so it doesn’t snap to the square grid. (Again, if there is one thing to remember it is that it seems Roll20 keeps a square grid internally even when showing hexes.) Keep dragging until you get the map to line up with the grid. You may need to go back to “Page Settings” to add a few more rows or columns of tiles.
- You can right click the map and move it to the Map Layer any time you want.
