07g. Bottom Bar View Options
The area at the bottom of the Worldographer window consolidates a number of settings that impact the view of your map. It looks like this:

Notes: Add/Edit/View
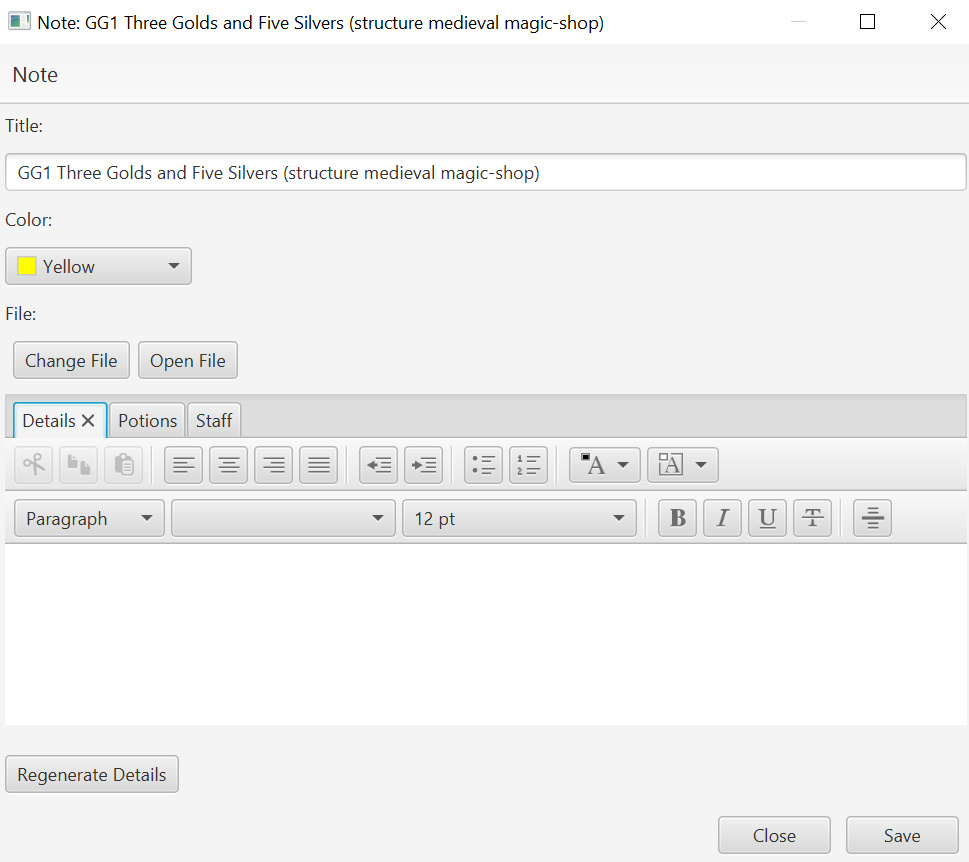
If selected, any notes on the map will appear as small squares (by default yellow, but the color can be changed on the Notes dialog). Notes are auto-generated for hex crawl locations (see the Generate menu) and settlement buildings when placed on the map and when you click the “F. Notes” or “Notes of Selected” (pre-2025 version) button on the Features drawer for some common world/kingdom features such as a city, village, castle, fort, etc. But you can also add a note anywhere on the map you wish with this button. (If a note isn’t where you click on the map, a new note will be added when the Note dialog is saved.) The notes dialog is briefly described here:

Note Dialog
- Title Field: Enter a title for this note. It could be the store name, city name, etc.
- Color: The color for the small note square placed on the map. (These can be turned off when viewing the map with the Show Notes checkbox listed below.)
- File: You can associate a file with this feature. It can be a picture of the building/feature, a spreadsheet of a store’s inventory, a link to another Worldographer map of the city’s layout or building’s floorplan, or any file on your computer.)
- Tabs (Details, Potions, Staff): Some tabs are text editor areas (as shown here) and others are mini spreadsheets for product lists & prices, details about residents or store staff or tavern customers, etc. Click a tab to see the related data.)
- Text Editor: A simplified word processor. Enter text for your note here. Use the controls to make it look prettier (font, size, bold, bullets, etc.
- Regenerate Details Button: For a feature where the system can randomly generate the data (most settlement buildings, as well as some world/kingdom features such as cities, villages, castles, ruins, etc.) click this button to regenerate the data. Note: this will wipe out all prior note data for this feature, not just the selected tab.
- Close: Closes the dialog without saving
- Save: Saves and closes the dialog.
Notes Filter
If selected, any notes will appear on the map as small squares, by default yellow in color, but the color of each can be changed in the Note Dialog above. The filter text field allows you to filter which notes are shown on the map. This is a great way to find all the buildings of a given type on the map. Type “Smith” and only your smiths will show. (Note: Armorers may not show unless named Armorsmiths.)
GM Only Show Checkbox
If selected, any GM Only items will be shown even if GM Only is set to true. This is a good way to briefly check the map: Hide it from your players, toggle this on, check the location of the dungeon or how large the next room is or whatever, then toggle this off, then show the map to your players again. For more on Worldographer’s Fog of War feature, go to that section on the Fog of War/Explore & Trace Underlay instructions page.
GM Only Glow Checkbox
To help a GM see which map objects have GM Only on, toggle this on (when the players can’t see the map).
Feature Labels Checkbox
Features can have labels associated with them. See the Features drawer instructions for details to set them up. However, they can clutter a map. Turn them on or off depending on if you want to see them via this checkbox.
Tags: Hide Objs w/
Shapes, features, and labels can all have tags added to them. For example, you could set map borders as “politiical” and geographic features as “geographic” and roads as “infrastructure”. Once that prep work is done, you can then hide any objects with a given tag by entering that tag here.
Tags: Show Objs w/
Entering any value here will hide all tagged map object except for those that have the tag you enter in this field.
Grid: Show Checkbox and Gear Button
If selected, the map’s grid will display. The gear button opens a dialog to let you configure the grid. See the Configuration Windows page for an explanation of it
Numbers Checkbox and Gear Button
If selected, numbers will appear in each tile. The gear button opens a dialog to let you configure the numbering scheme. See the Configuration Windows page for an explanation of it
Shadows Checkbox
Drawing drop shadows and inner shadows (for Shapes) in “real time” can increase the time Worldographer needs to redraw the portion of the map shown. If you have many shadows, you may want to uncheck this box until you plan to export the image.
